UAV MATE — USER MANUAL
About this manual
This manual is task‑oriented: start with Quick Start for the workflow you need, then use the Reference chapters for details on every screen.
Conventions used in this manual
Note — Useful background or context.
Tip — A faster or better way to do something.
Warning — Read before continuing; ignoring this may cause data loss or inaccurate results.
Figures. Console screenshots are taken directly from the device consoles.
Revision history
| Version | Date | Changes |
|---|---|---|
| 2.1 | September 2026 | Updated static‑data retrieval steps (§12) and firmware update steps (§14). |
| 2.0 | July 2026 | First release for the dual‑console firmware (Simple and Professional). |
1. Overview
UAV Mate has two operating roles. You choose the role in the console; the device performs one role at a time.
| Role | What it does | Typical use |
|---|---|---|
| PPP Base Station | Acquires its own absolute position from the PPP correction service, then broadcasts RTK corrections to nearby rovers/drones over a private Wi‑Fi NTRIP caster. | Drone (UAV) mapping flights that need RTK/PPK, set up anywhere with no local infrastructure. |
| Rover | Receives corrections (PPP, NTRIP, or radio) and outputs a precise position; can measure and log ground control points. | Surveying GCPs to check or georeference a drone survey. |
Note — Because UAV Mate gets its base coordinate from PPP, you do not need to set up over a known mark or connect to a CORS network. The base coordinate is delivered in ITRF2020, current epoch.
2. What's in the box
Contents may vary with the kit you ordered. A typical kit includes:
- UAV Mate GNSS receiver
- Type‑C to USB cable (charging and data)
- 410–470 MHz UHF whip antenna and extension pole — for the internal radio
- Carrying case
- Quick Start Guide
- (Optional) 5/8″ × 11 mounting connector (for tripod/pole)
Note — Contents vary with the kit ordered; check your kit against its packing list.
3. Hardware overview
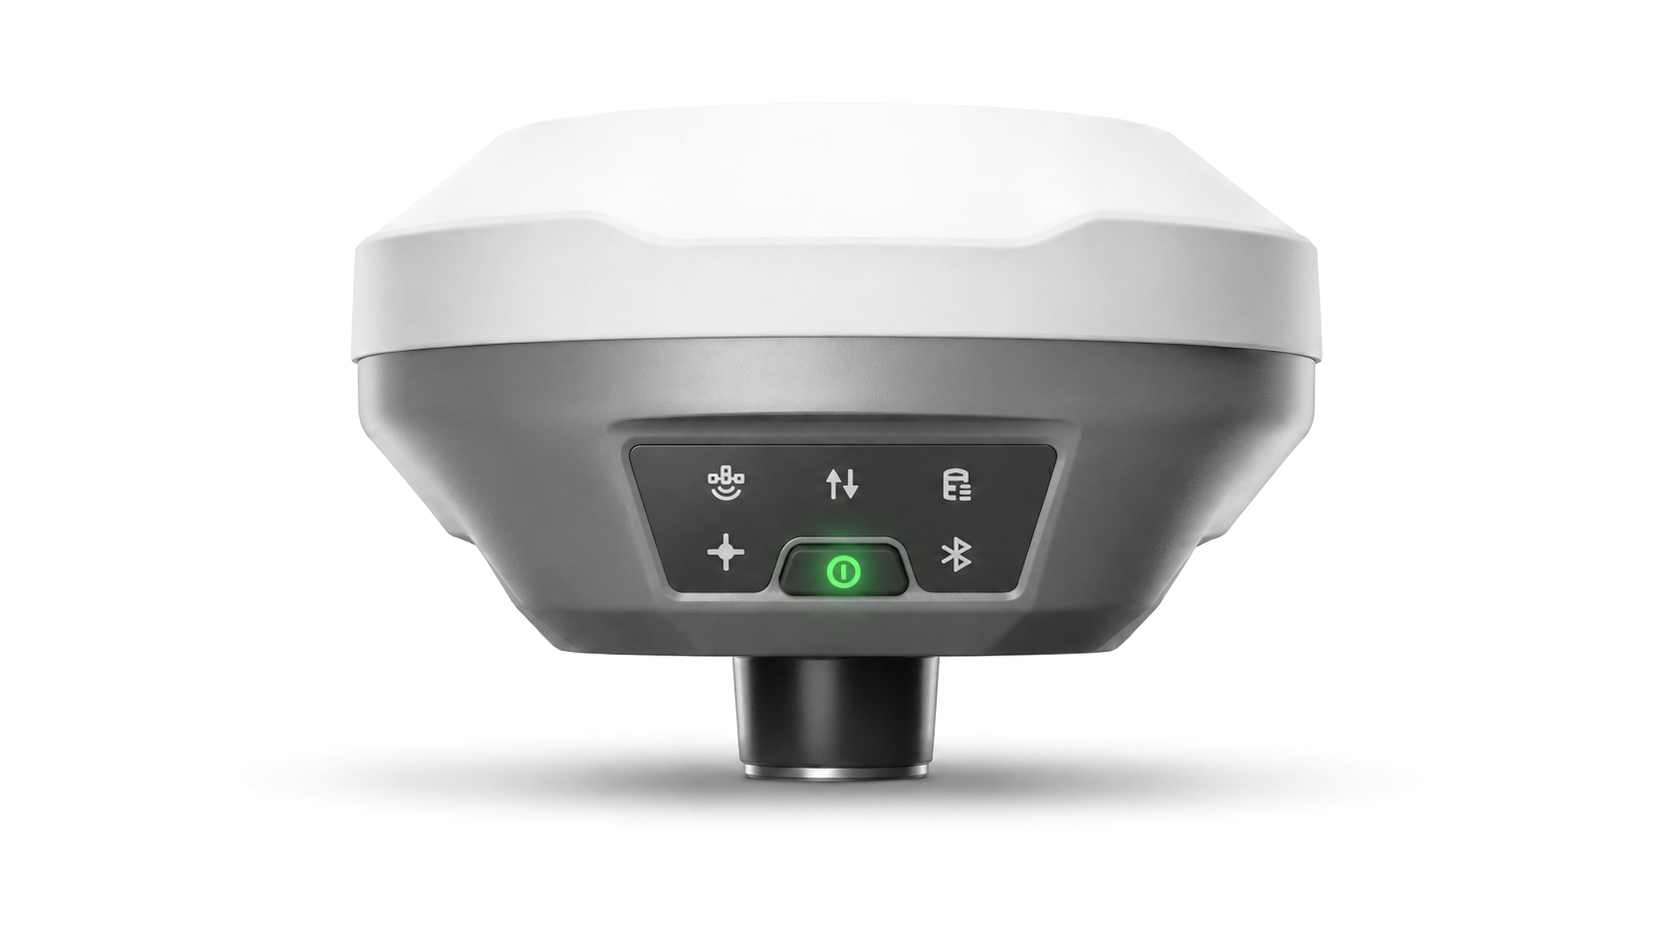
UAV Mate has a white faceted GNSS dome on top of a charcoal body. The front control panel carries the status icons and the power button; the bottom connector mounts the unit to a pole, tripod, or drone mount.
3.1 Control‑panel indicators (LEDs)
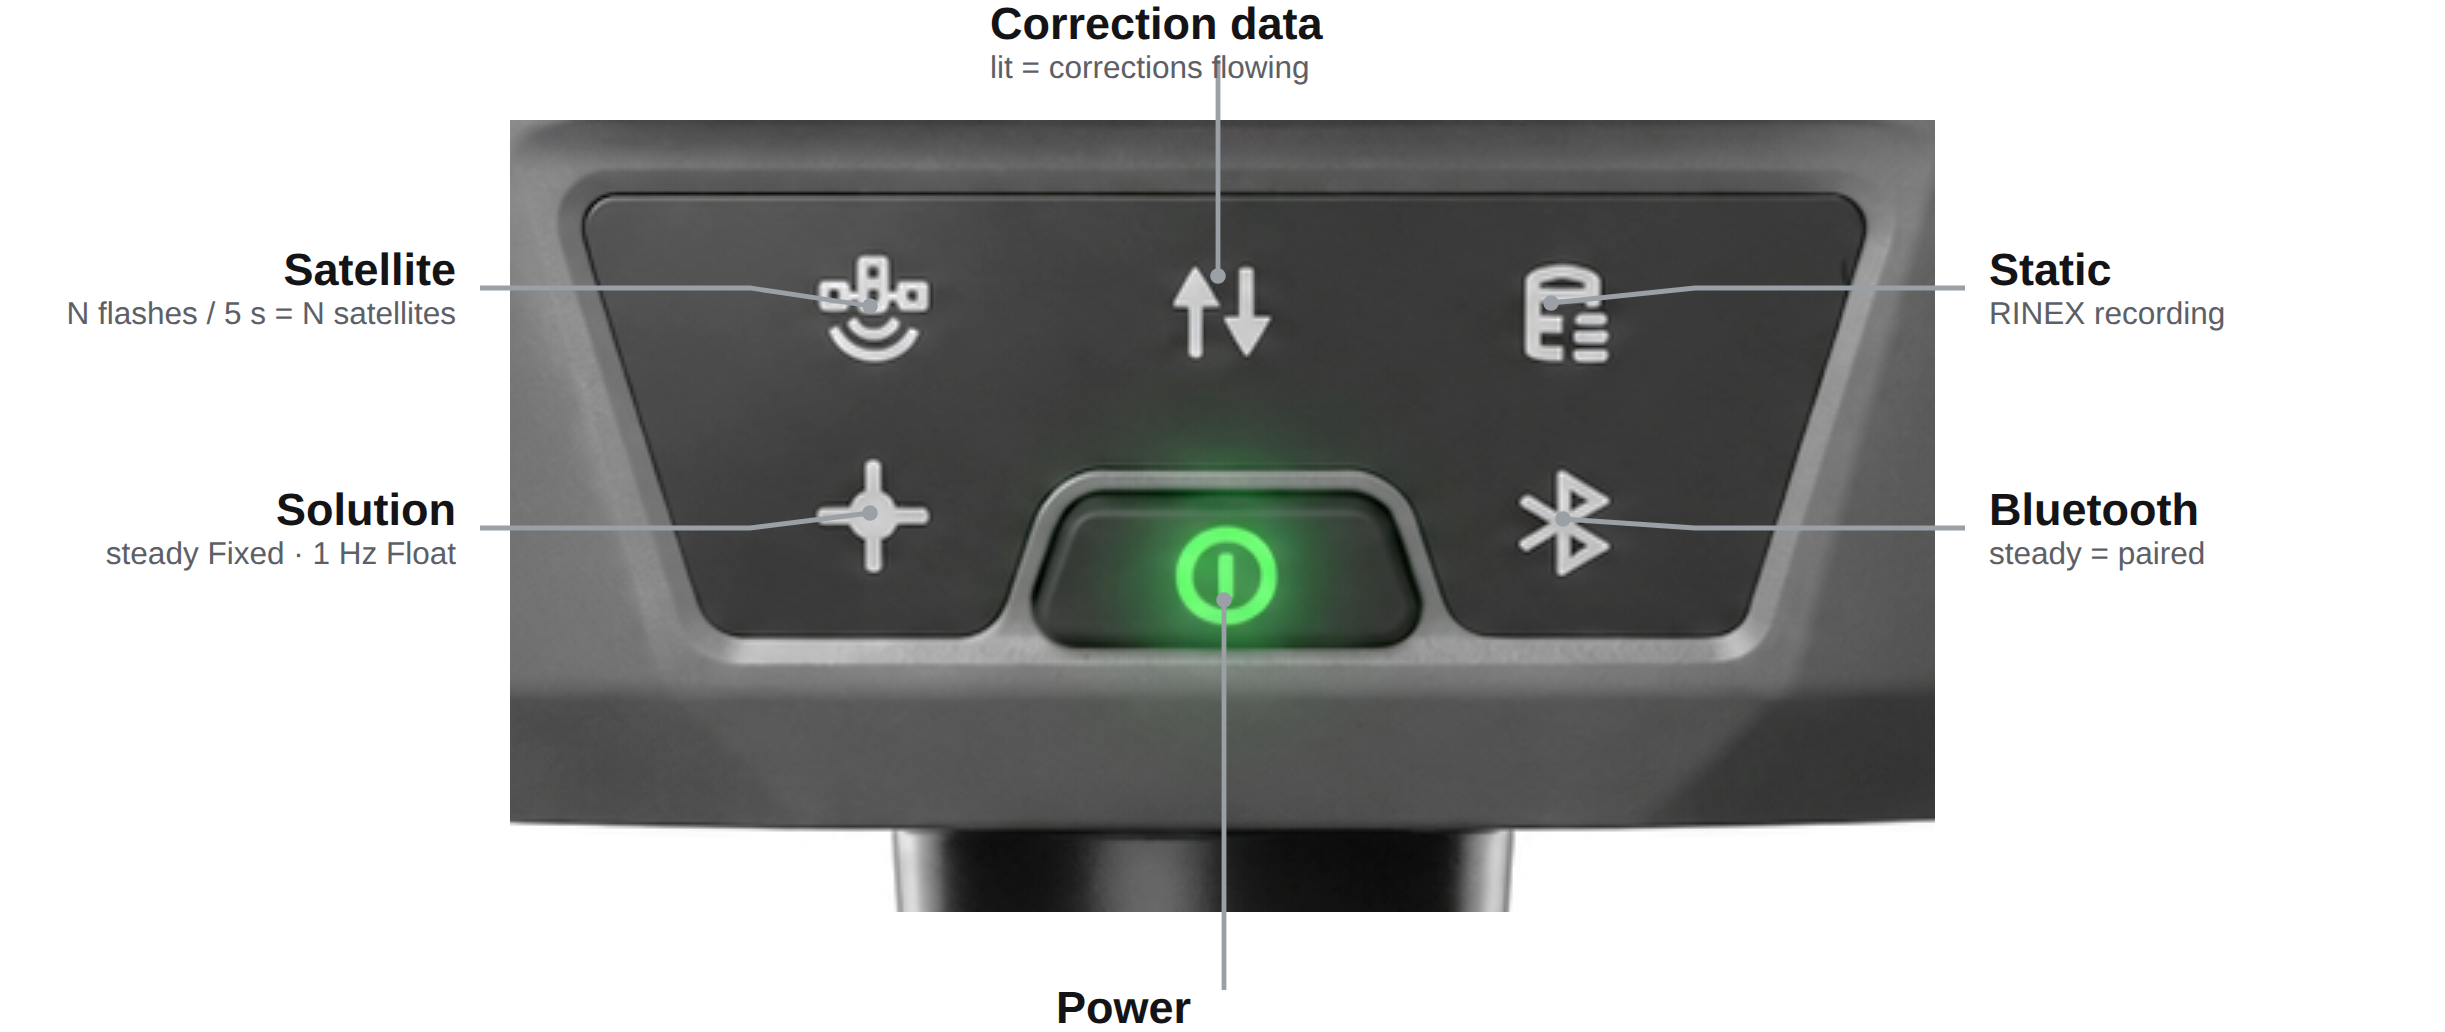
UAV Mate has five green status LEDs on the front panel — Satellite, Correction Data, Static Survey, Solution, Bluetooth — plus the power button. The smart battery has its own power display on the bottom. The receiver also supports voice prompts.
| LED | Indication |
|---|---|
| Satellite | Flashes once every 5 s while searching. Once satellites are tracked, it flashes N times every 5 s, where N is the number of satellites tracked. |
| Correction data | Indicates correction data is being received. |
| Static Survey | On while the receiver is in static‑survey (logging) mode. |
| Solution status | Steady = Fixed solution · flashing at 1 Hz = Float solution · off = other solutions. |
| Bluetooth | Steady = Bluetooth paired · off = no device paired. |
Smart battery / power display (bottom). Press the battery button to show the remaining charge — each lit segment ≈ 25 %. While charging, the display flashes to show the current level; at 20–10 % it flashes slowly and below 10 % it flashes fast (charge soon). The unit also has a built‑in electronic bubble for levelling.
3.2 LED behaviour at a glance
| State | LED behaviour |
|---|---|
| Power on | Hold the power button ~2 s — all LEDs light, go off, then each LED resumes live status. |
| Power off | Hold the power button ~5 s — all LEDs turn off. |
| Low battery | The bottom power display flashes slowly (20–10 %), then fast (< 10 %). |
| Firmware upgrade | All five LEDs light briefly, then cycle while upgrading; the unit restarts when finished. Do not power off during an upgrade. |
3.3 Power button
- On: press and hold ~2 seconds.
- Off: press and hold ~5 seconds (release when all LEDs turn off).
3.4 Ports and mounting (bottom)
| Port | Use |
|---|---|
| Serial port & external power | Device/computer/USB‑drive connection, external power, communication, external radio. |
| SIM slot | Nano‑SIM card (for the cellular module). |
| TNC port | 410–470 MHz UHF radio antenna. |
| 5/8″ × 11 screw hole | Standard surveying connector for tripod, pole, or mount. |
Mount the unit on a stable tripod/pole (base or rover) or the appropriate drone/vehicle mount via the 5/8″ connector.
3.5 Power, charging & battery
- Built‑in 7000 mAh / 7.4 V lithium battery — up to 10 hours of field work (varies with radio/cellular use, temperature, and battery age).
- Fast charging up to 15 W (5 V / 3 A) over USB‑C; about 3 hours from 20 % to 90 %.
- External power: USB 5–20 V.
- Charge between +10 °C and +45 °C.
- IP68 dust‑ and water‑proof.
4. Connecting to the Device Console
The Device Console is hosted on the receiver itself. No internet connection is required in the field.
- Power on UAV Mate and wait for the green power LED.
- On your phone, tablet, or laptop, open Wi‑Fi settings and connect to the receiver's hotspot
UAV MATE-<SN>— where<SN>is your unit's serial number (a numeric string printed on the device label). The hotspot is open — no Wi‑Fi password. - Open a web browser and go to the receiver's console address
http://192.168.2.1:8080. - Sign in at the Device console login screen with the default password
uavmate. You can sign out later under Device › Sign out (Simple console) or via the Professional console header.
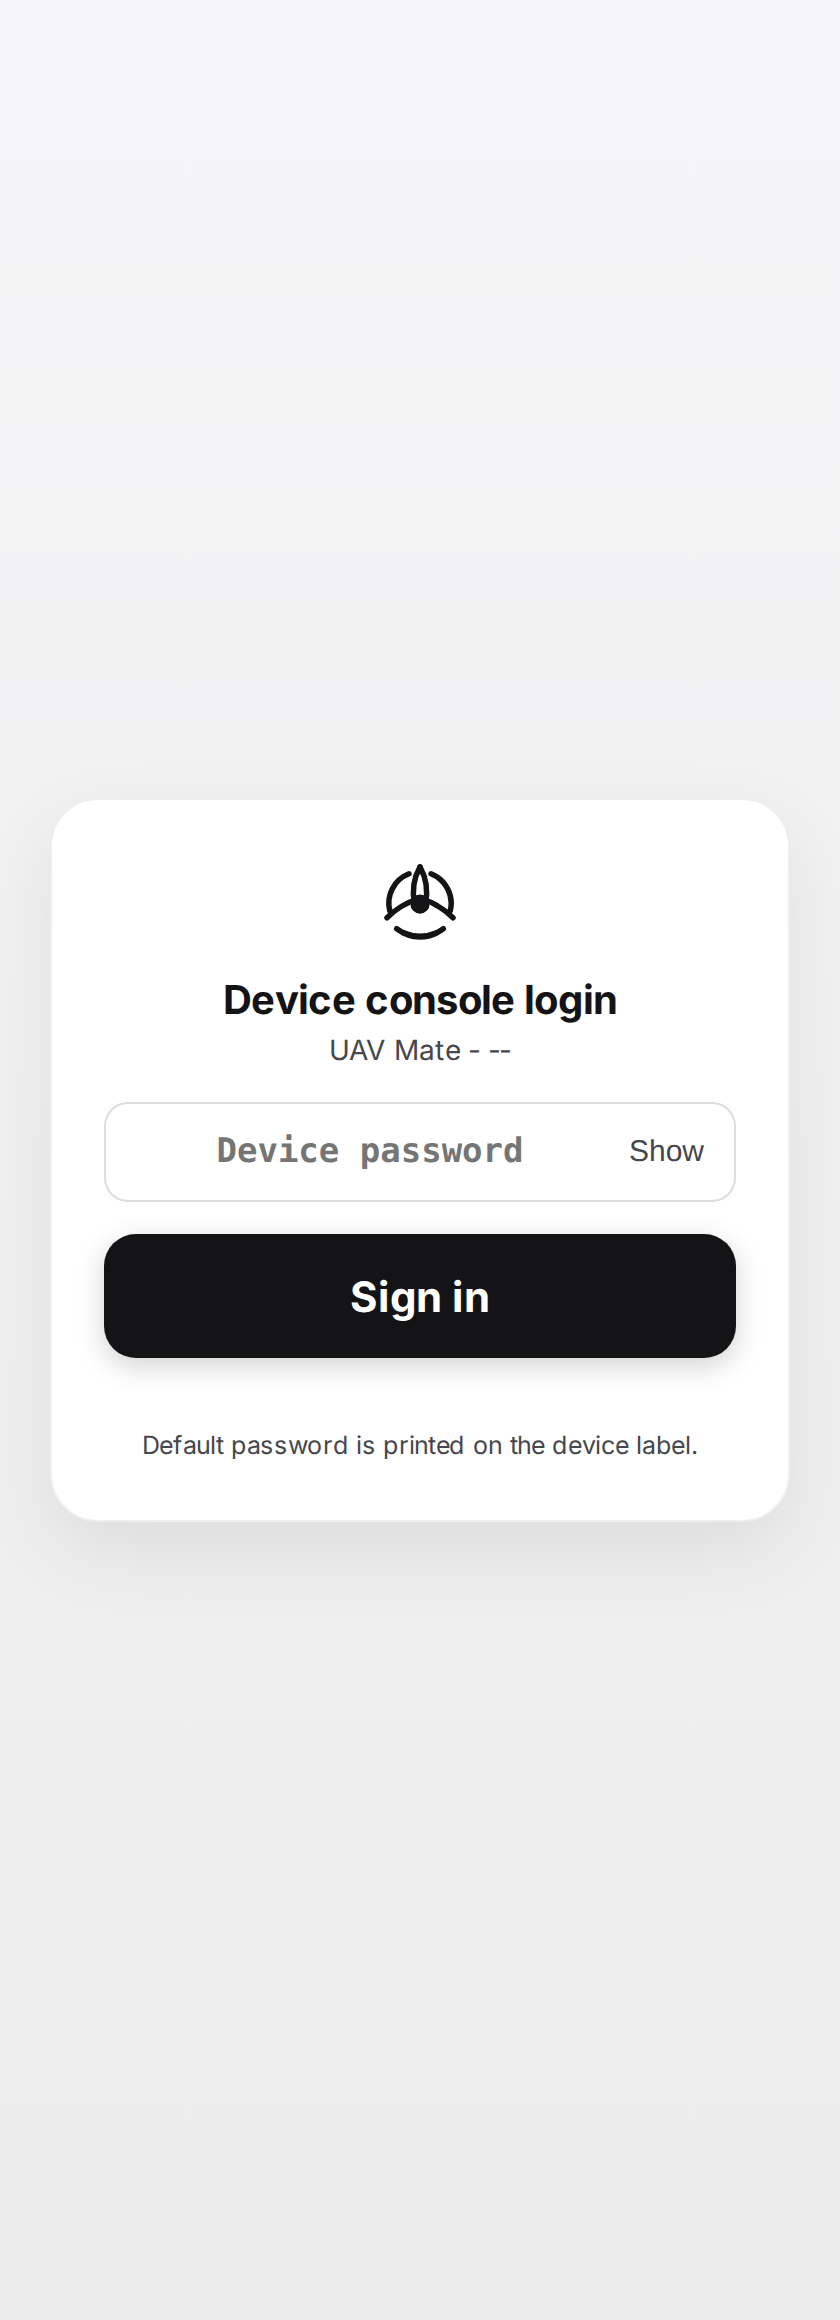
Tip — The console is responsive and works on a phone. On small screens the left menu becomes a hamburger drawer at the top‑left.
Note — You can confirm or change the Wi‑Fi name, IP, and MAC address later under System (see §14).
5. Two consoles: Simple and Professional
UAV Mate ships with two consoles on the same device. Both control the same receiver — pick whichever suits the task and switch at any time.
| Simple console (default) | Professional console | |
|---|---|---|
| For | Everyday base + GCP work, phone‑first | Full control, diagnostics, integrations |
| Screens | Base Station · GCP Collection · Device | Dashboard, Device Config, PPP Status, Static Survey, GCP Manager, Advanced I/O, System |
| Switch | Device › Open Professional Console | Back to Simple Console (bottom of the console) |
Signing in with the password on the device label opens the Simple console. Your sign‑in is shared between both consoles.
5.1 Simple console — Base Station tab
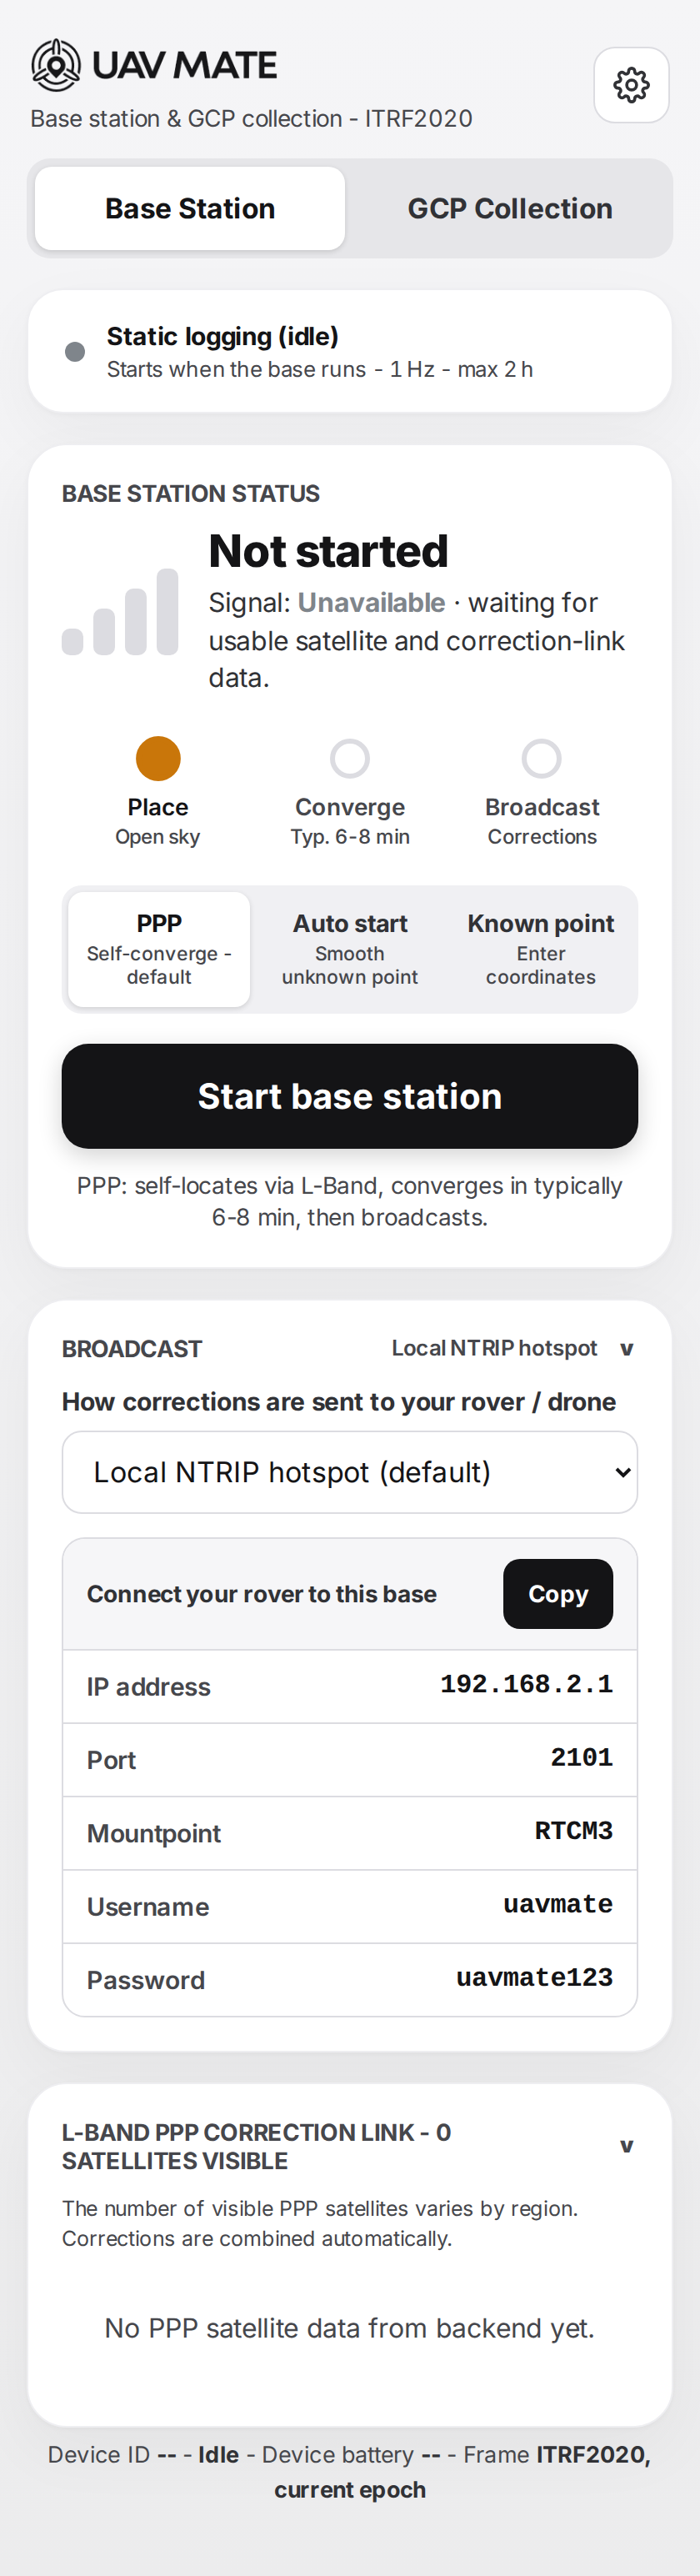
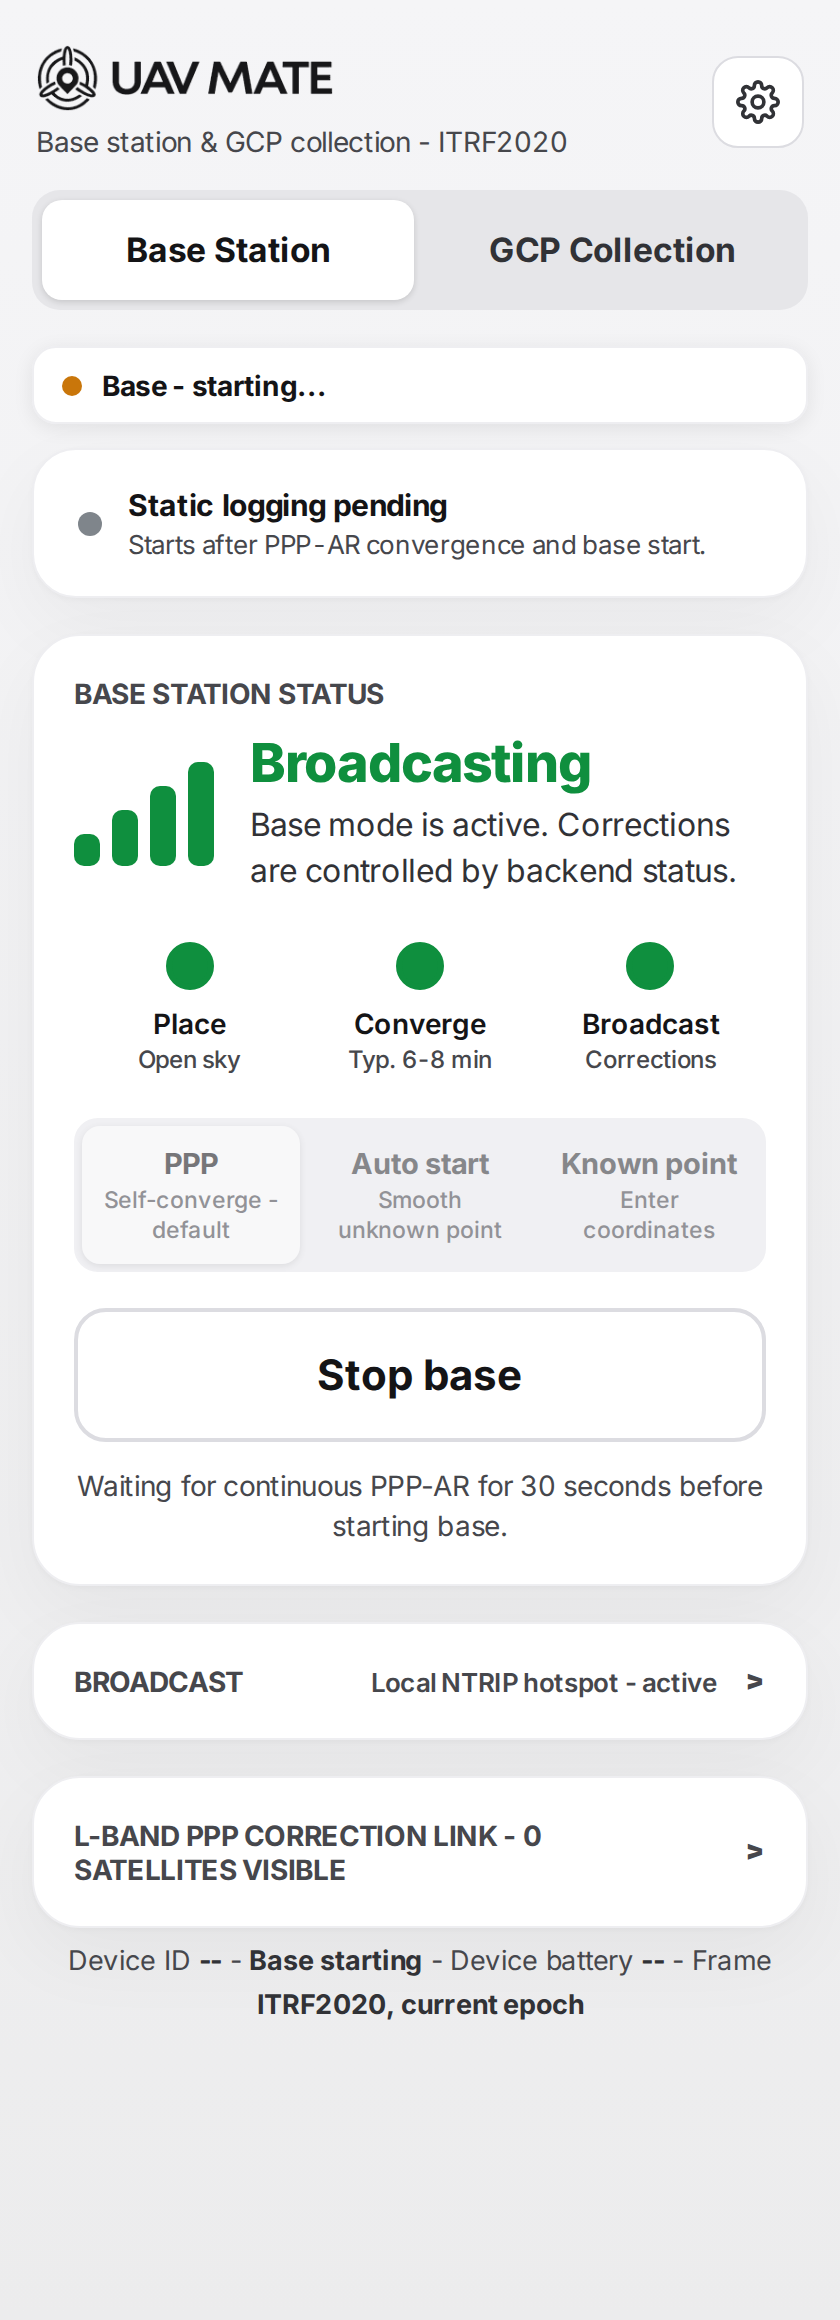
Everything needed to run a PPP base on one screen:
- Static logging strip — RINEX 3.x raw logging (1 Hz, max 2 h) starts automatically with the base (see §12).
- Base station status card — signal bars, a large state label, and the three stages Place → Converge (typ. 3 min) → Broadcast.
- Start mode — PPP (self‑converge, default), Auto start (smooth an unknown point), or Known point (enter latitude / longitude / ellipsoidal height).
- Broadcast card — how corrections reach your rover / drone: Local NTRIP hotspot (default; credentials shown with a Copy button), Internal radio (UHF) (channel, TX power, protocol, air baud), or External NTRIP server (4G) (requires a SIM and a cellular setup — see §14). Broadcast settings are locked while the base runs.
- L‑Band PPP correction link — how many PPP correction satellites are visible at your location.
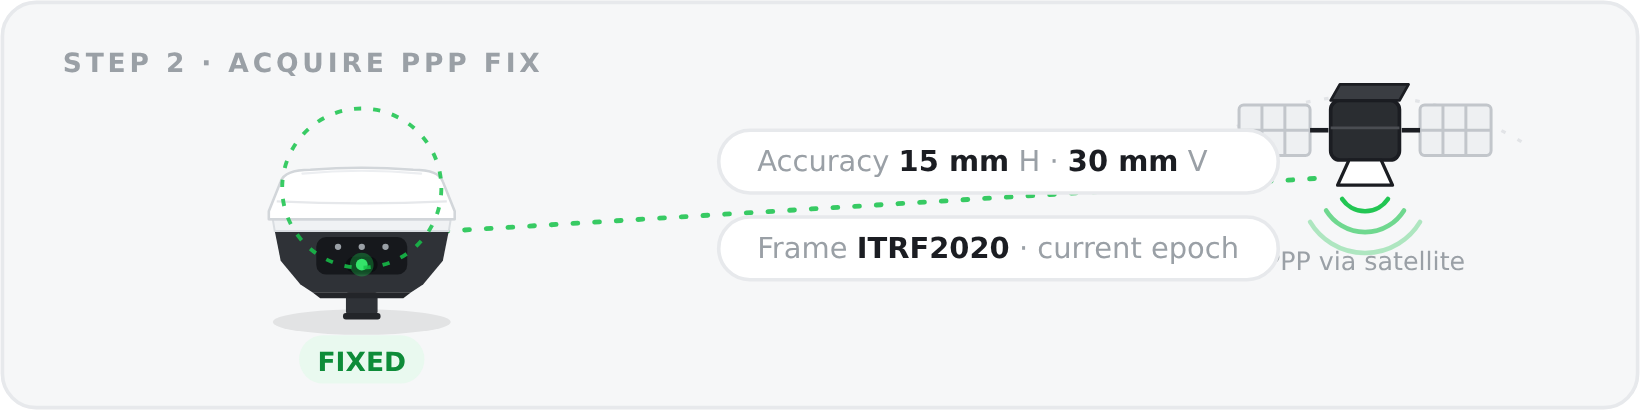
- Base position card — once fixed: latitude / longitude / ellipsoidal height in ITRF2020, current epoch with Accuracy H 1.5 cm / V 3.0 cm and a Copy button. Record this position for your flight‑planning software.
One unit, one role — starting the base stops GCP collection, and vice‑versa. The console tells you before it switches.
5.2 Simple console — GCP Collection tab
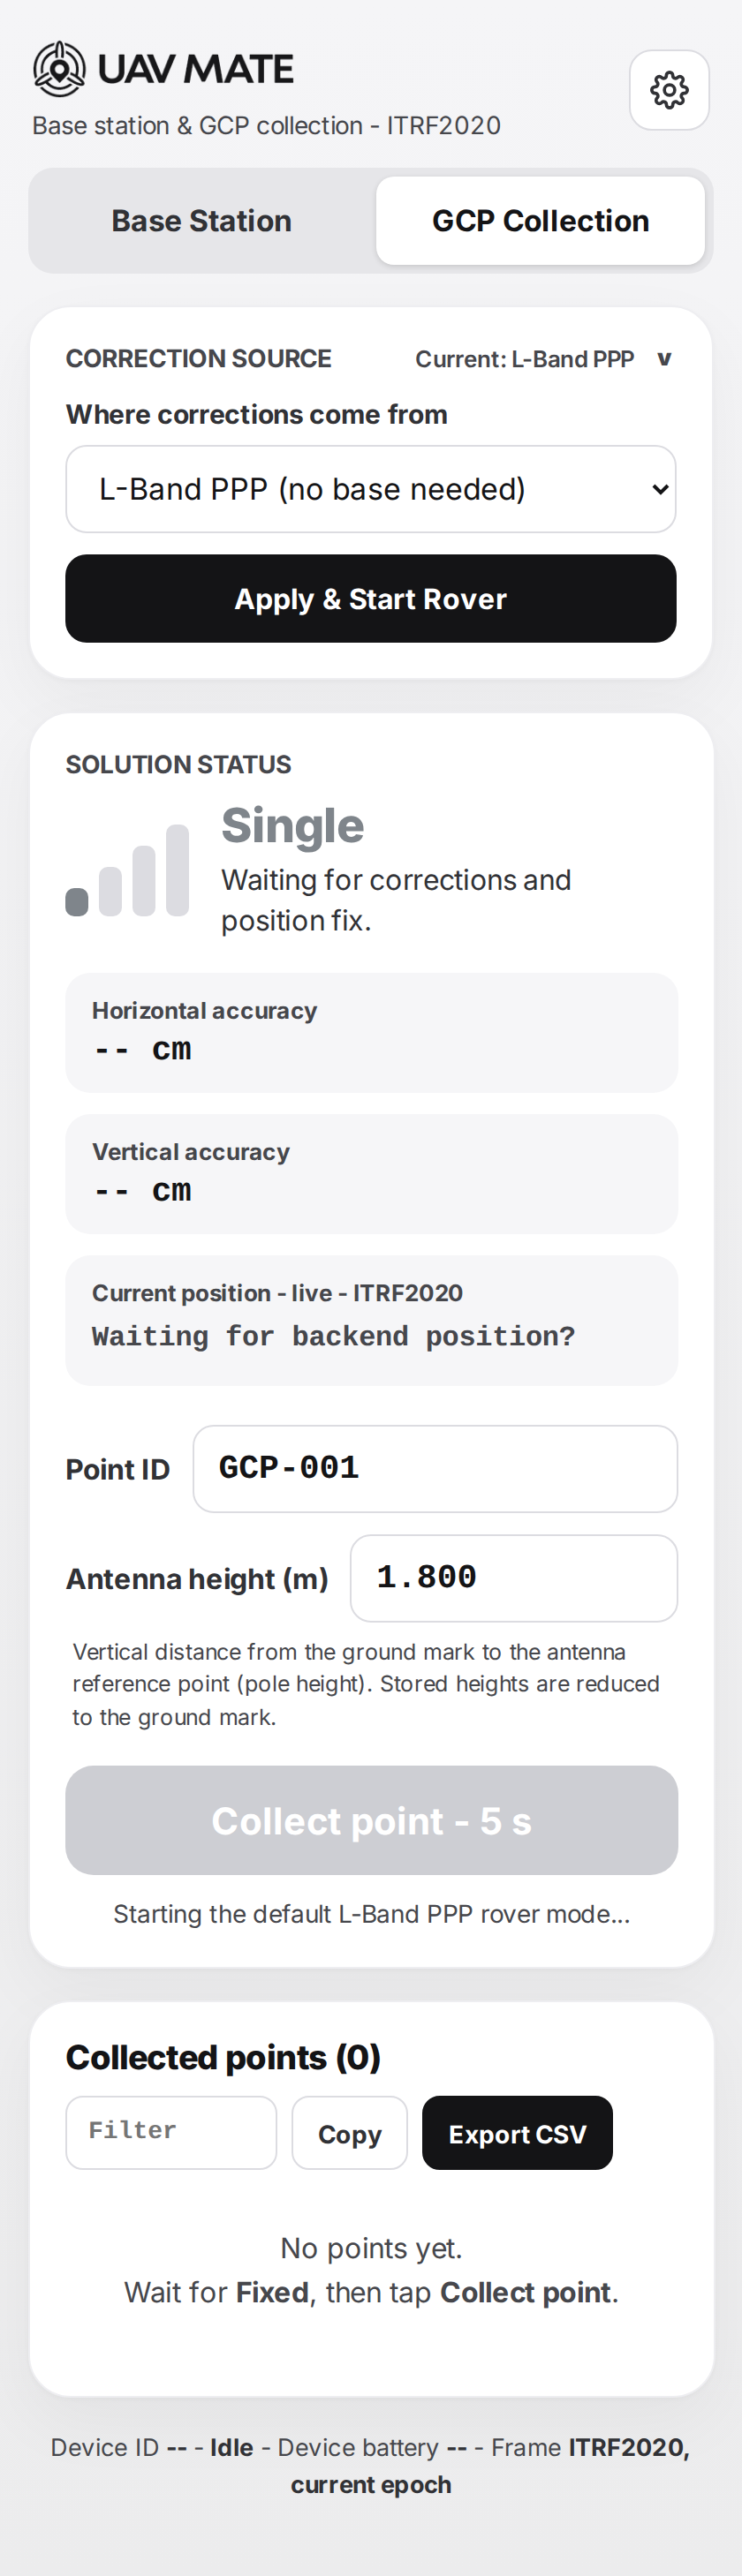
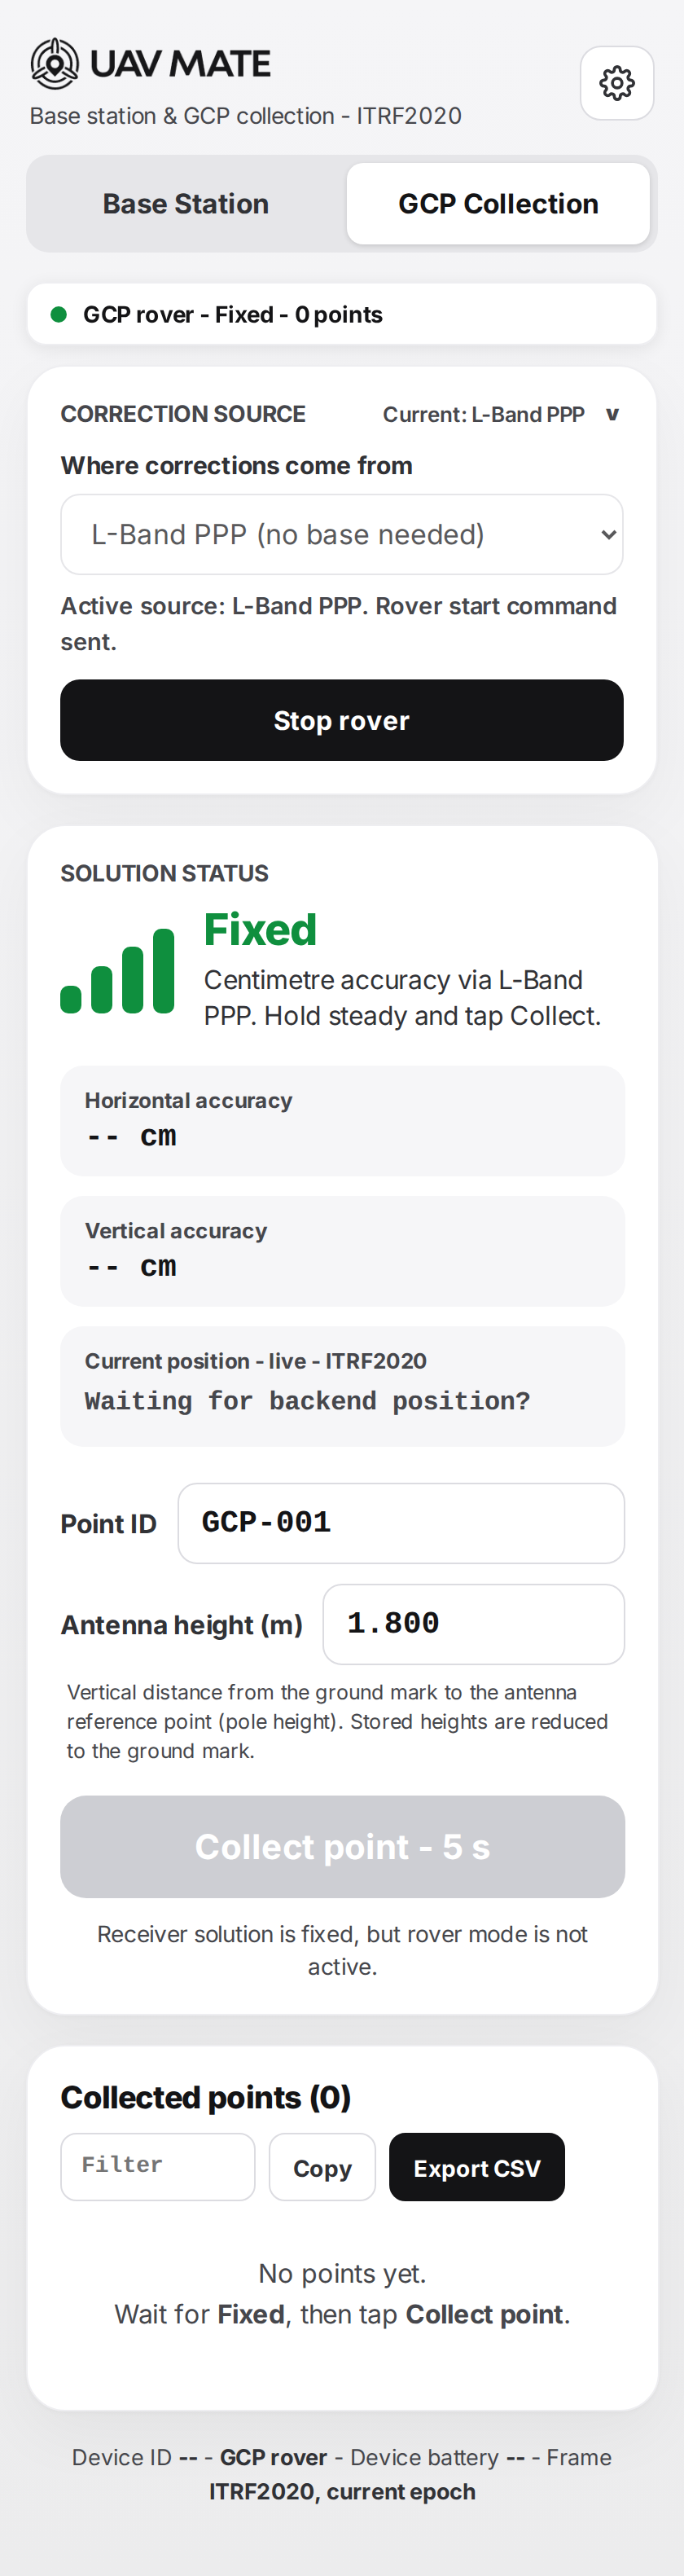
- Correction source — L‑Band PPP (no base needed), CORS (your NTRIP account over 4G), or Radio (corrections from an external base — match the transmitter's channel, protocol and air baud). Apply with Apply & Start Rover.
- Solution status card — live state with horizontal / vertical accuracy and the live position (ITRF2020).
- Collect point — enter a Point ID and the antenna height (vertical distance from the ground mark to the antenna reference point; stored heights are reduced to the ground mark), wait for Fixed, then hold the pole steady for the 5‑second occupation.
- Collected points — review, Copy, or Export CSV (see §19 for the CSV format).
5.3 Simple console — Device settings (gear icon)
Tap the gear icon in the top‑right corner to open the Device settings screen. From top to bottom it contains:
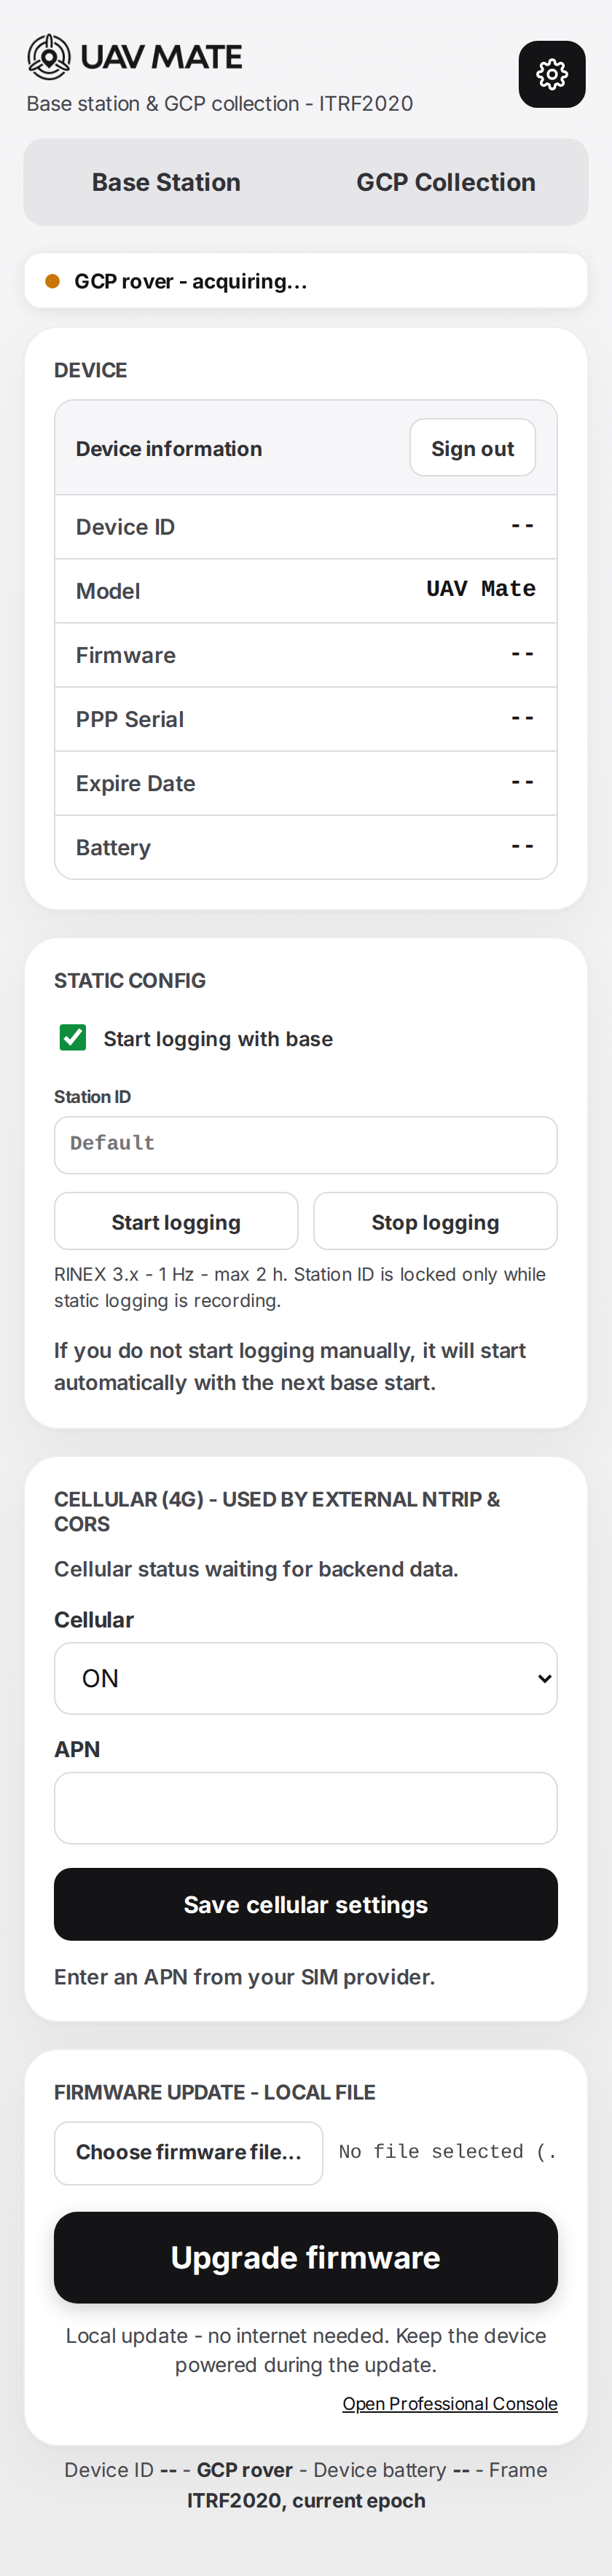
Device — device information: Device ID, model, firmware version, PPP serial number and expiry date, battery level. The Sign out button is here too.
Static config — controls raw‑data (RINEX) logging:
| Control | Notes |
|---|---|
| Start logging with base | When on, logging starts automatically each time the base station starts. |
| Station ID | Name written into the log files (default: Default). Locked while a recording is running. |
| Start logging / Stop logging | Manual control at any time. |
Logging is RINEX 3.x at 1 Hz, up to 2 h per session. To copy the recorded files to a computer, see §12.
Cellular (4G) — used by External NTRIP & CORS — switch cellular ON/OFF, enter the APN from your SIM provider, optional APN username and password, choose the Authentication method (None / PAP / CHAP / PAP‑CHAP), then tap Save cellular settings. See §14 for details.
Firmware update — local file — choose a firmware file (.bin) from your phone or laptop and tap Upgrade firmware; no internet needed. See §14 for both update methods.
Open Professional Console — the button at the very bottom of the screen. Tap it to switch to the Professional console, described next in §5.4 and page by page in Chapters 9–14. To return, use Back to Simple Console at the bottom of the Professional console.
5.4 Professional console at a glance
The Professional console is the full‑depth interface. The left‑hand menu is the main navigation:
| Menu item | Purpose |
|---|---|
| Dashboard | Live status: connection, current mode, solution status, satellites, battery, serial, broadcast; skyplot; signal strength; quick actions; and Guided setup (the two wizards). |
| Device Configuration | Choose and configure the operating role — Base Mode, Rover, Tilt Compensation. |
| PPP Configuration | PPP correction service settings and the live PPP status display. |
| I/O Configuration | Output method & ports, NMEA messages, the Local NTRIP Caster, and radio settings. |
| Static Survey | Record a static raw‑data session (RINEX) for post‑processing. |
| GCP Manager | Measure, review, and export Ground Control Points. |
| Modules | Optional hardware modules (e.g. cellular). |
| System | Wi‑Fi, cellular, power/battery, firmware update, config backup/restore, reboot/reset. |
Guided setup (Professional)
The Dashboard's Guided setup card exposes two step‑by‑step wizards — the PPP Base Wizard and the Rover & GCP Wizard. Each is a 3‑step guide with a live PPP status display (see §10 and §15); you can close it at any time and configure manually.
6. Placement and site selection
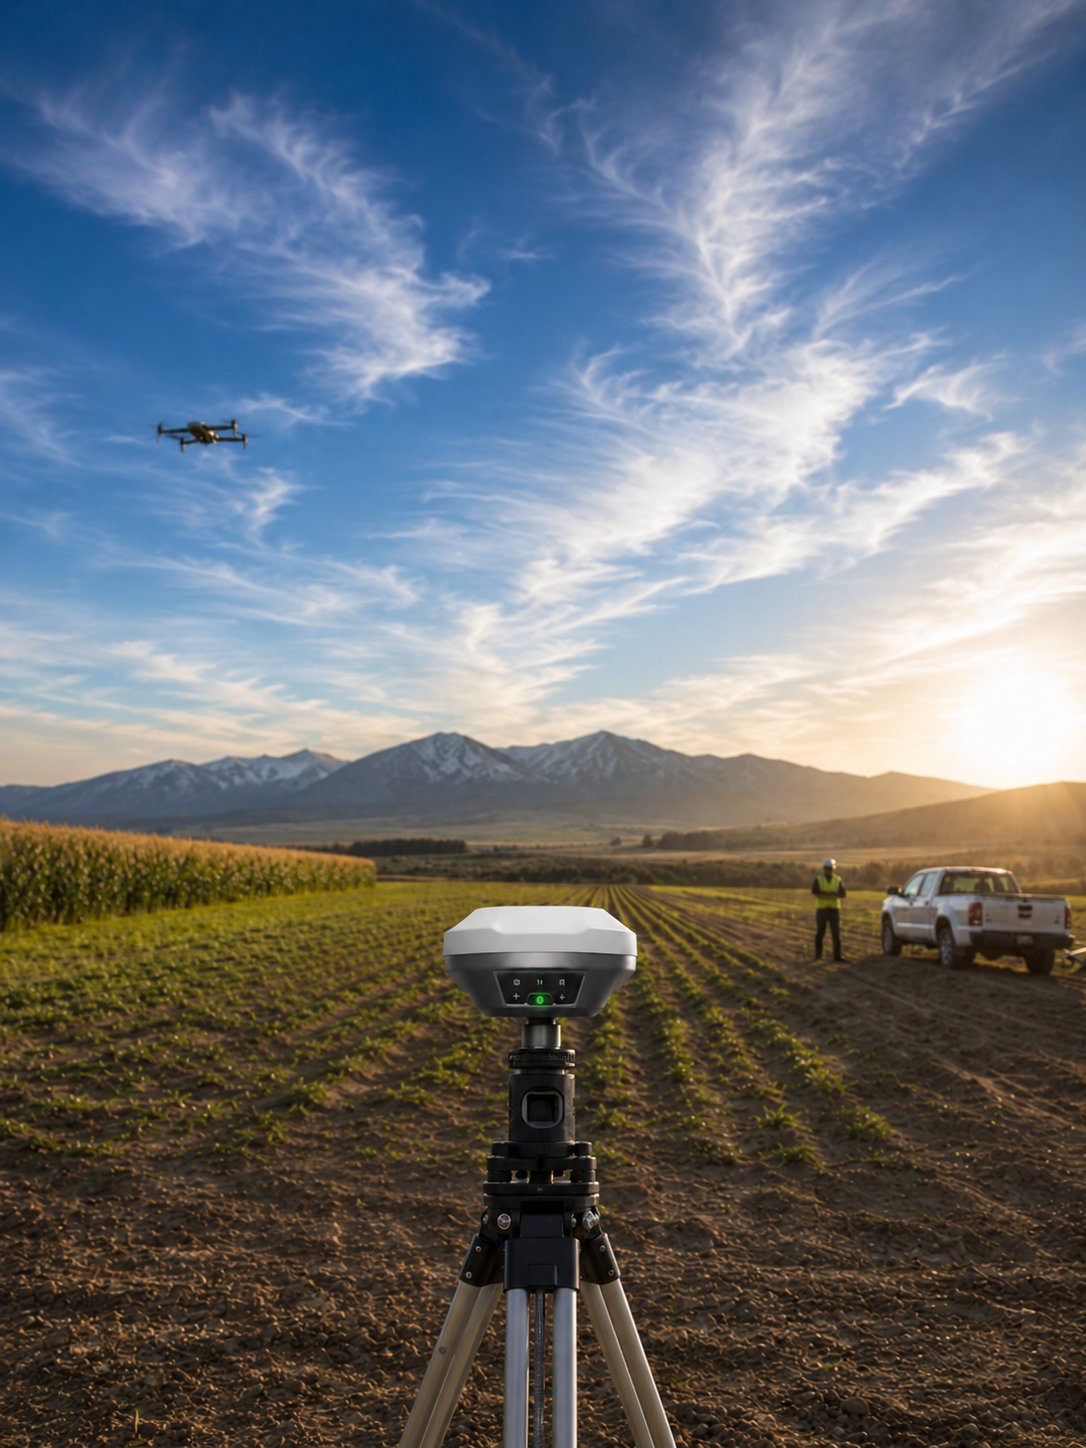
Where you put UAV Mate matters as much as how you configure it: placement drives how fast it reaches a fix and how accurate the result is. Choose the spot before you power through the setup.
6.1 Sky view and obstructions
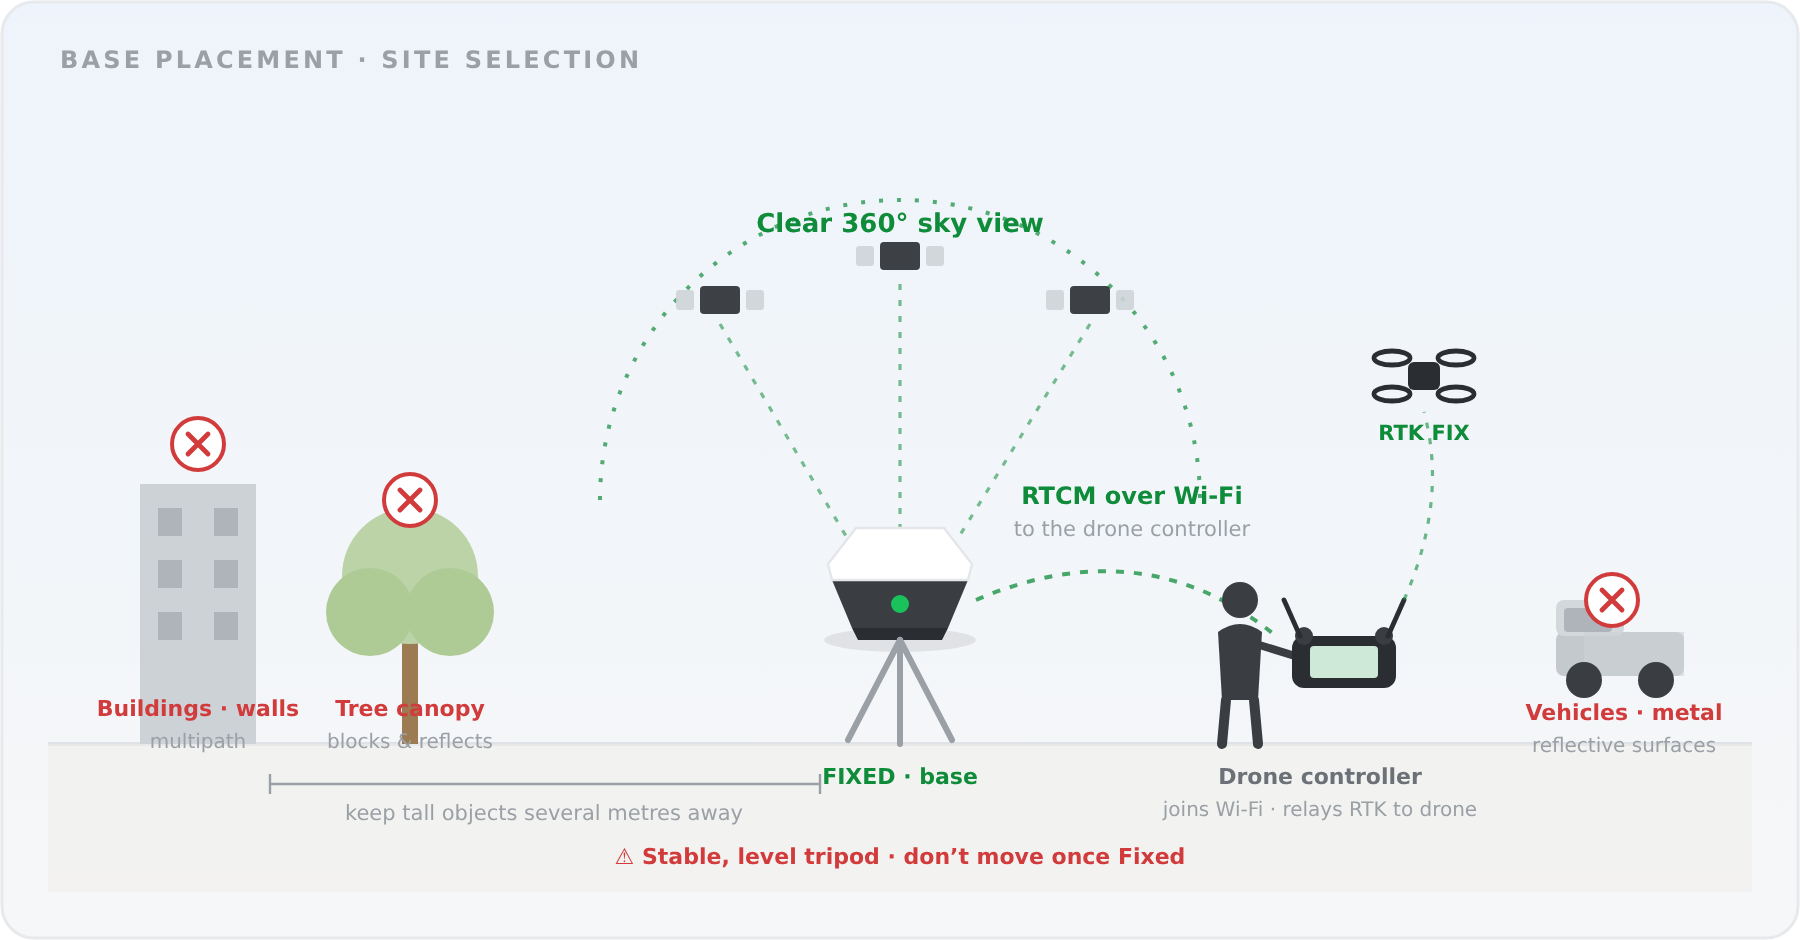
- Set up in the open, with a clear view of the sky in every direction — the fewer obstructions, the faster and more reliable the fix.
- Keep well clear of buildings, walls, dense tree canopy, vehicles, and large metal or glass surfaces. Signals reflecting off these (multipath) reduce accuracy and can stop the receiver from fixing.
- Avoid setting up directly beneath power lines or next to transmitting antennas.
Tip — Rule of thumb: if you can see open sky all around and nothing tall is within a few metres, it's a good spot.
6.2 Mounting the base
- Mount UAV Mate on a stable tripod or fixed pillar so it cannot move, sink, or be knocked.
- Level it with the tribrach bubble and tighten every connection so the unit is rigid.
Warning — After the base has fixed and started broadcasting, do not move or re‑level it. Moving the antenna invalidates the base coordinate and every drone/rover position derived from it.
6.3 Antenna height
Accurate heights depend on entering the correct antenna height — the vertical distance from the ground mark to the receiver's antenna reference point (ARP).
- Measure with a tape or the tripod's graduated rod, and record it consistently (always to the same reference).
- Enter the value where the workflow asks for it: Static Survey, GCP Manager → Antenna height, or your drone software's base‑height field.
- Measure to the ARP (the receiver's mounting base). The ARP‑to‑phase‑centre offset is applied automatically by the receiver — there is nothing to configure in the console, and stored heights are reduced to the ground mark.
6.4 Base‑to‑controller range
- The drone's remote controller joins UAV Mate's Wi‑Fi and pulls the RTCM corrections, then relays them up to the drone over its own control link — the drone itself never connects to UAV Mate's Wi‑Fi directly.
- Keep the controller within reliable Wi‑Fi range of the base; the drone can then fly wherever its own control link reaches.
6.5 Rover placement (GCP collection)
- Hold the pole vertical with the bubble centred while measuring — or enable Tilt Compensation (Device Configuration → Tilt) and let the unit correct for pole tilt.
- Rest the pole tip precisely on the mark and hold it steady for the full sample count.
- Stay in the open; step away from walls, vehicles, and canopy that can block or reflect signals.
7. Quick Start A — Set up a PPP base station
Use this workflow to put UAV Mate on a tripod and broadcast RTK to your drone. It uses the Simple console — Base Station tab (see §5.1).
7.1 Step 1 — Place and start
- Mount the receiver on a stable tripod with a clear, open view of the sky (§6). Once started, don't move it.
- On the Base Station tab, keep PPP (self‑converge) selected. To use a surveyed mark instead, choose Known point and enter its latitude, longitude and ellipsoidal height — the console sanity‑checks your entry against the observed position.
- Tap Start base station.
7.2 Step 2 — Converge
The status card shows Converging… with live progress — typically about 3 minutes under open sky (longer with obstructions). It's a good window to set up your drone. Broadcasting starts automatically once converged; static RINEX logging runs alongside (§12).
7.3 Step 3 — Broadcast & connect the drone
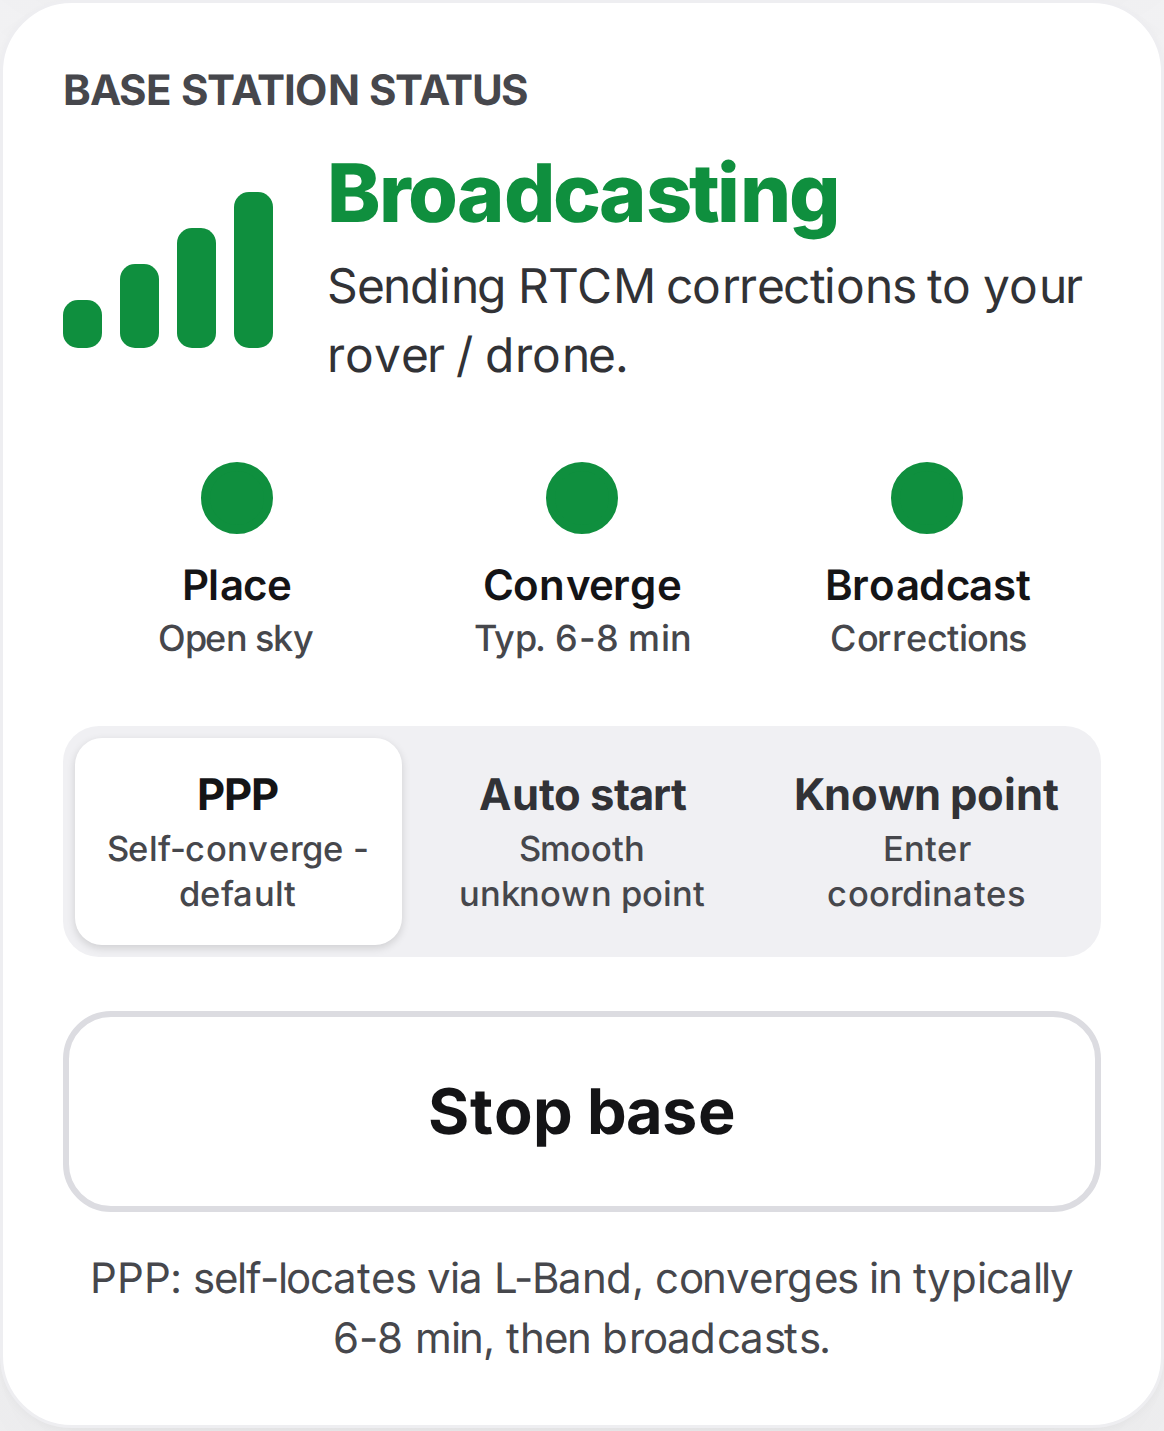
When the card reads Broadcasting, the base position (ITRF2020, current epoch; typ. H 1.5 cm / V 3.0 cm) appears with a Copy button — record it for your flight‑planning software.
Connect the drone in two steps:
- On the drone remote controller, open Wi‑Fi settings and join UAV Mate's hotspot
UAV MATE-<SN>(open — no password). The controller needs this link to reach the base's NTRIP caster. - In the flight‑control app, choose custom network RTK / NTRIP and enter:
| Setting | Value |
|---|---|
| IP address | 192.168.2.1 |
| Port | 2101 |
| Mountpoint | RTCM3 |
| Username / Password | uavmate / uavmate123 |
No Wi‑Fi on the controller? In the Broadcast card choose Internal radio (UHF) — set the rover radio to the same channel, protocol and air baud — or External NTRIP server (4G) with a SIM installed (§14).
Confirm the drone shows RTK Fix — then you're ready to fly.
Professional alternative — the PPP Base Wizard (Dashboard › Guided setup) walks the same flow in the Professional console, with the live PPP status display and skyplot.
8. Quick Start B — Collect GCPs in rover mode
Use this workflow to walk a pole and measure ground control points, on the Simple console — GCP Collection tab (see §5.2). UAV Mate can correct itself via L‑Band PPP (no base needed), a CORS NTRIP account over 4G, or an external base over radio.
8.1 Step 1 — Choose the correction source
Open GCP Collection. One unit plays one role at a time — if the base is broadcasting, tap Stop base first. Pick the source, fill in its details (CORS: caster address, port, mountpoint, account; Radio: channel, protocol, air baud matching the transmitter), then tap Apply & Start Rover.
8.2 Step 2 — Reach a Fixed solution
The solution card walks through Acquiring… → Float → Fixed with live horizontal / vertical accuracy. With PPP, expect the usual convergence time; with CORS or radio, Fixed typically arrives within seconds. Collection is blocked until the solution is Fixed.
8.3 Step 3 — Measure & export
- Enter a Point ID (auto‑incremented if left blank) and the antenna height — pole height from the ground mark to the antenna reference point. Stored heights are reduced to the ground mark.
- Put the pole tip on the mark, hold it steady, and tap Collect point — 5 s. Keep still for the 5‑second occupation.
- Repeat for each point. Review the Collected points list, then Copy or Export CSV (§19).
Professional alternative — the Rover & GCP Wizard and GCP Manager offer the same flow plus tilt compensation (§9.3), CSV import, and per‑point solution records.
9. Reference — Device Configuration
Device Configuration has three tabs: Base Mode, Rover, and Tilt Compensation.
9.1 Base Mode Config
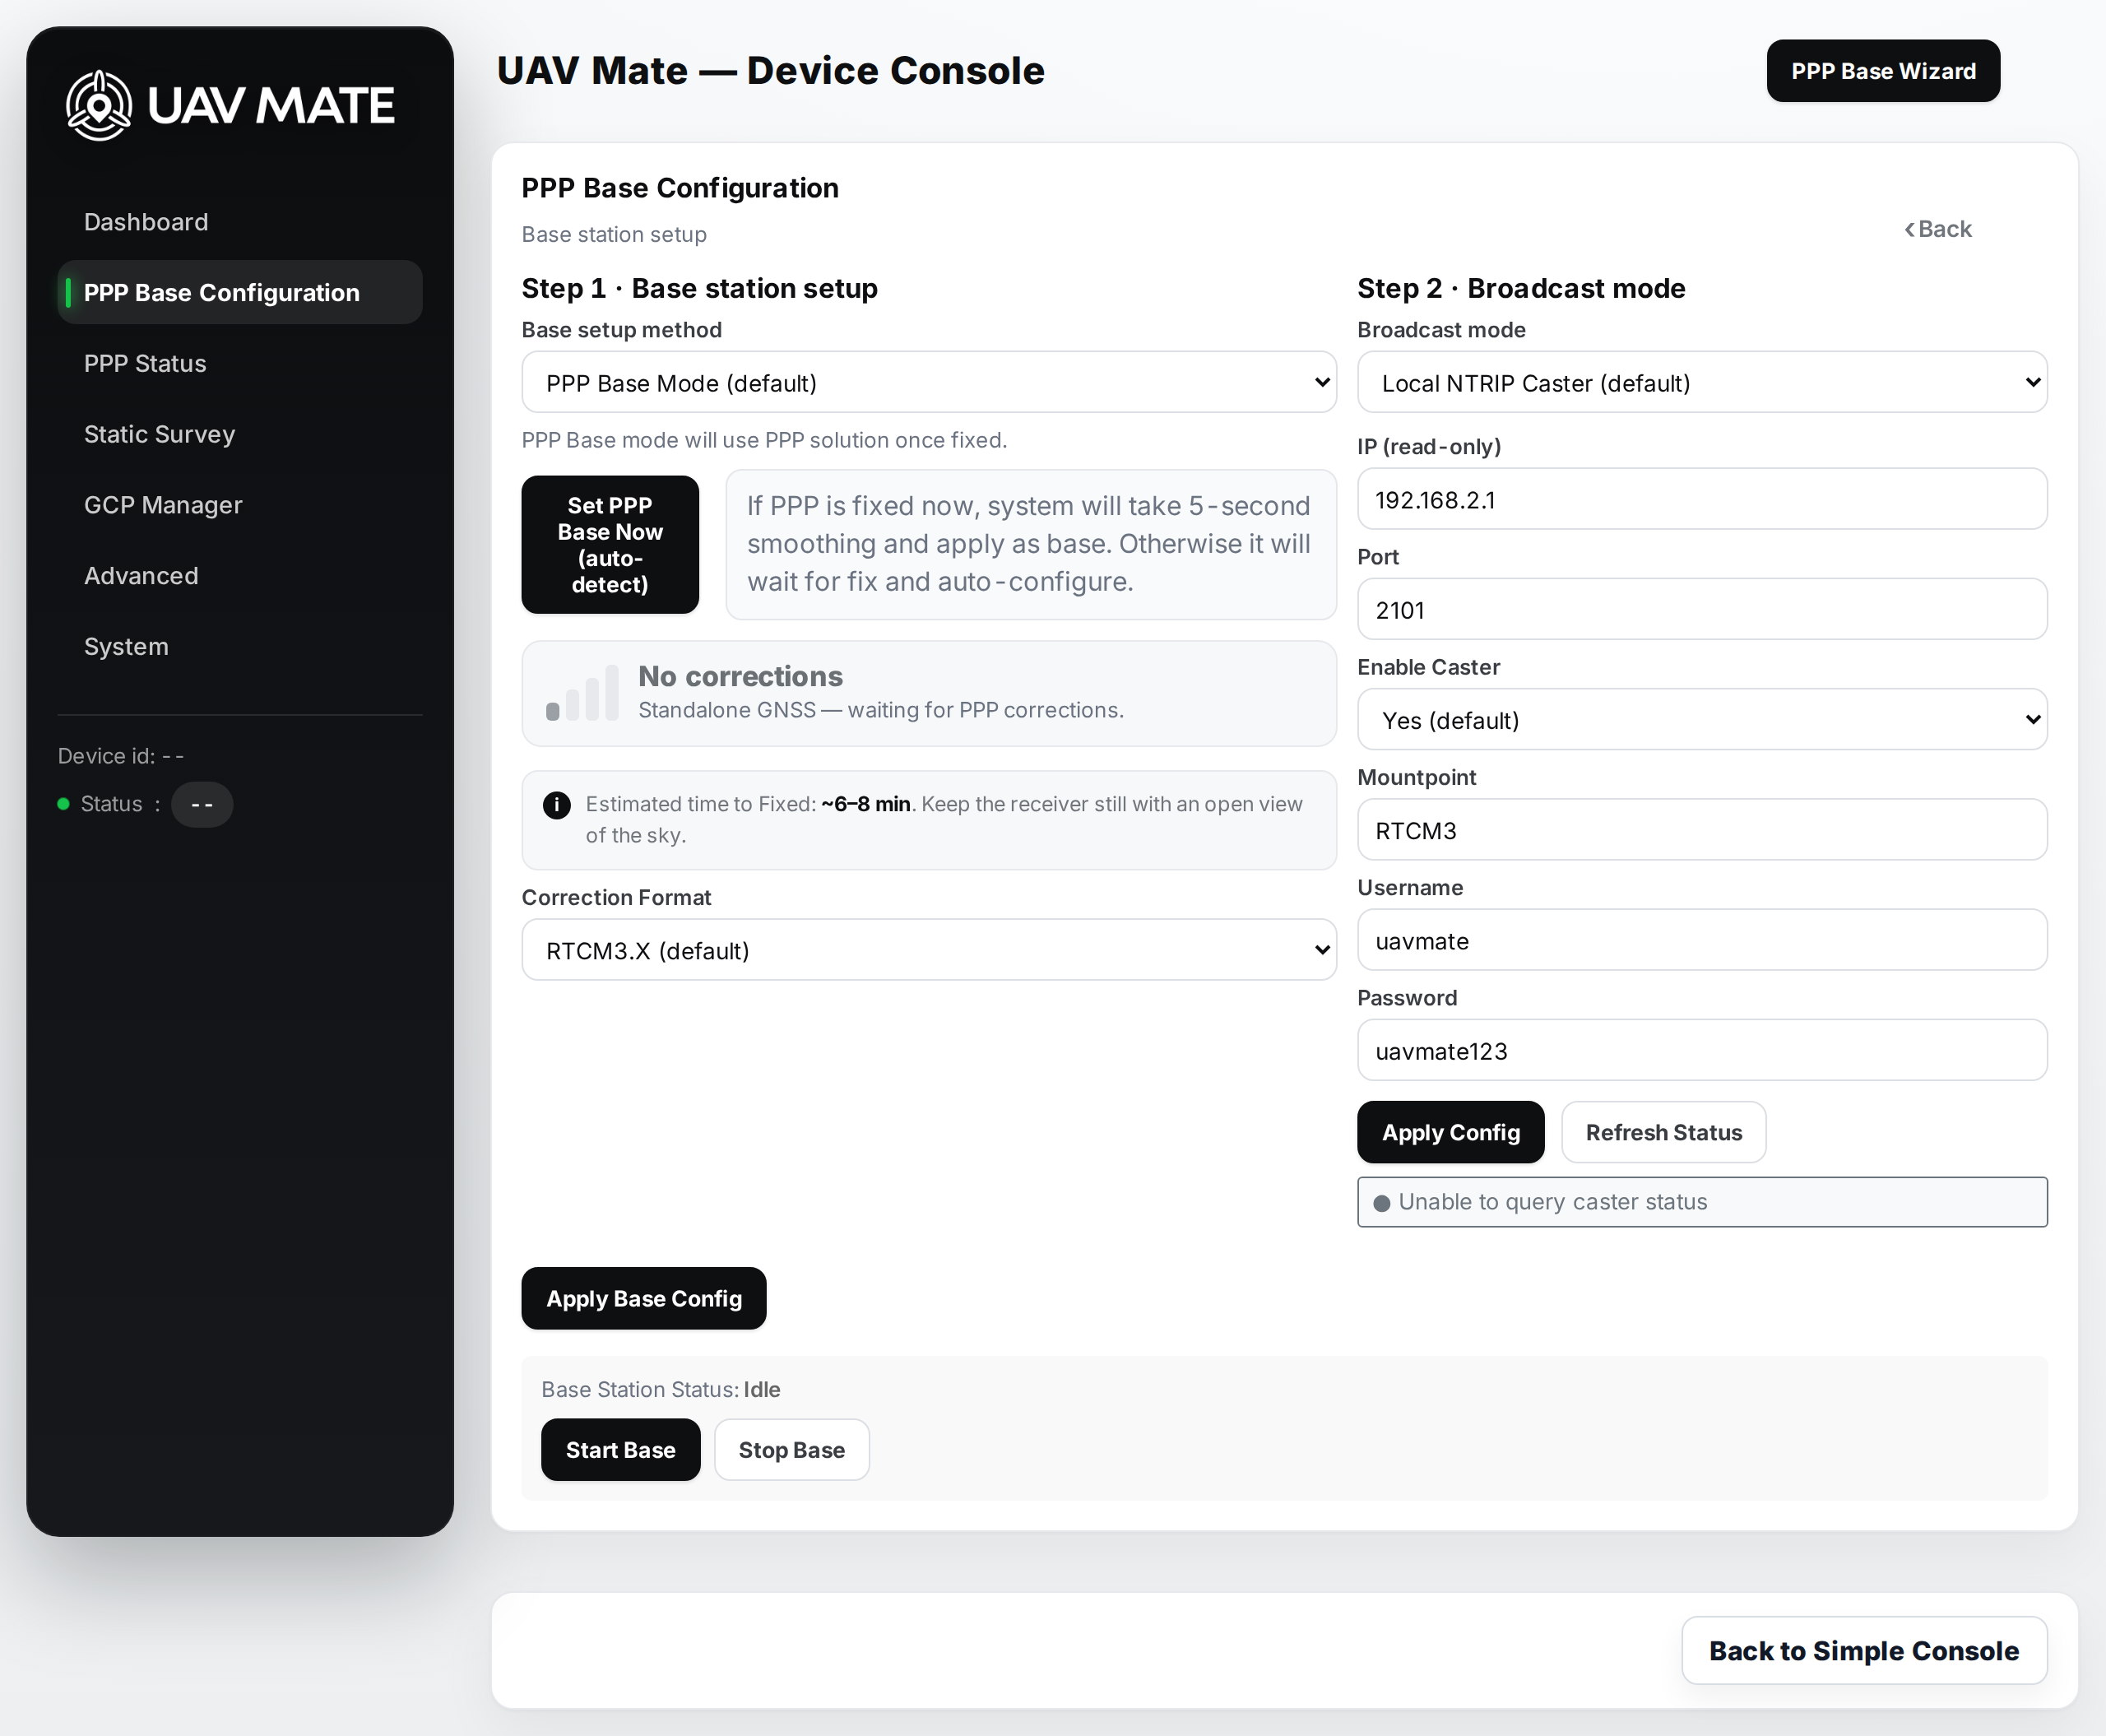
| Field | Options / notes |
|---|---|
| Base setup method | PPP Base Mode · Enter known coordinates · Average for N seconds (10 / 30 / 60 s) |
| Correction Format | RTCM3.X · RTCM3.0 · RTCM2.3 · CMR · CMR+ |
| (known coordinates) | Latitude, Longitude, Ellipsoid Height (m) — used only with Enter known coordinates |
| Broadcast mode | Local NTRIP Caster · NTRIP Caster · Internal Radio |
| Buttons | Set PPP Base Now (auto‑detect), Apply Base Config, Start Base, Stop Base |
Base Station Status shows the live base state.
9.2 Rover
| Field | Options / notes |
|---|---|
| Rover input | NTRIP Client · TCP · Internal Radio · PPP (satellite corrections, no base) |
| (NTRIP/TCP fields) | IP, Port, Mountpoint, Username, Password, Connection timeout (s) — shown for the relevant input |
| Buttons | Apply Rover Config, Start Rover, Stop Rover |
Tip — With PPP rover input the device corrects itself anywhere; you do not need to deploy a separate base for GCP work.
9.3 Tilt Compensation
| Field | Notes |
|---|---|
| Tilt Sensor | Enable / disable the tilt (IMU) hardware. |
| Tilt Compensation | Enable so pole tilt is corrected in measurements using pole height. |
| Pole height (m) | Enter the pole height, then Save Pole Height. |
| Tilt data | Live tilt status / attitude. |
Calibration‑free tilt. UAV Mate's tilt compensation needs no magnetic calibration and is immune to magnetic disturbances, with accuracy of ≤ 2 cm within 60° of tilt. To initialise, enable Tilt Compensation and then move/rock the pole gently as prompted until the console reports a valid attitude.
Warning — When tilt compensation is enabled, GCP measurement requires tilt initialisation to be complete (a valid attitude). Move/rotate the pole to initialise if prompted.
10. Reference — PPP Configuration
The PPP Configuration page controls the satellite PPP correction service the base (or rover) uses.
| Field | Notes |
|---|---|
| PPP / L‑Band source | The satellite correction channel (e.g. L‑Band (PPP)). |
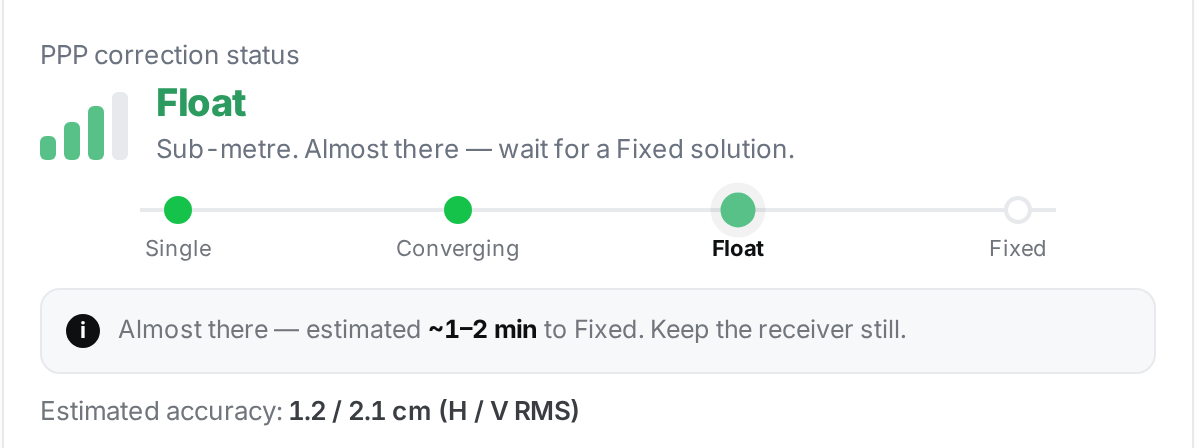
| PPP correction status | A live indicator: signal bars plus a colour‑coded four‑stage progression Single → Converging → Float → Fixed, an estimated time to Fixed that narrows as the solution converges, and the estimated accuracy (H / V RMS) once a solution is available. See §15 for the underlying status groups. |
| Subscription | Service serial/subscription details, where applicable. |
Note — On UAV Mate the correction service is labelled PPP throughout the console.
11. Reference — I/O Configuration
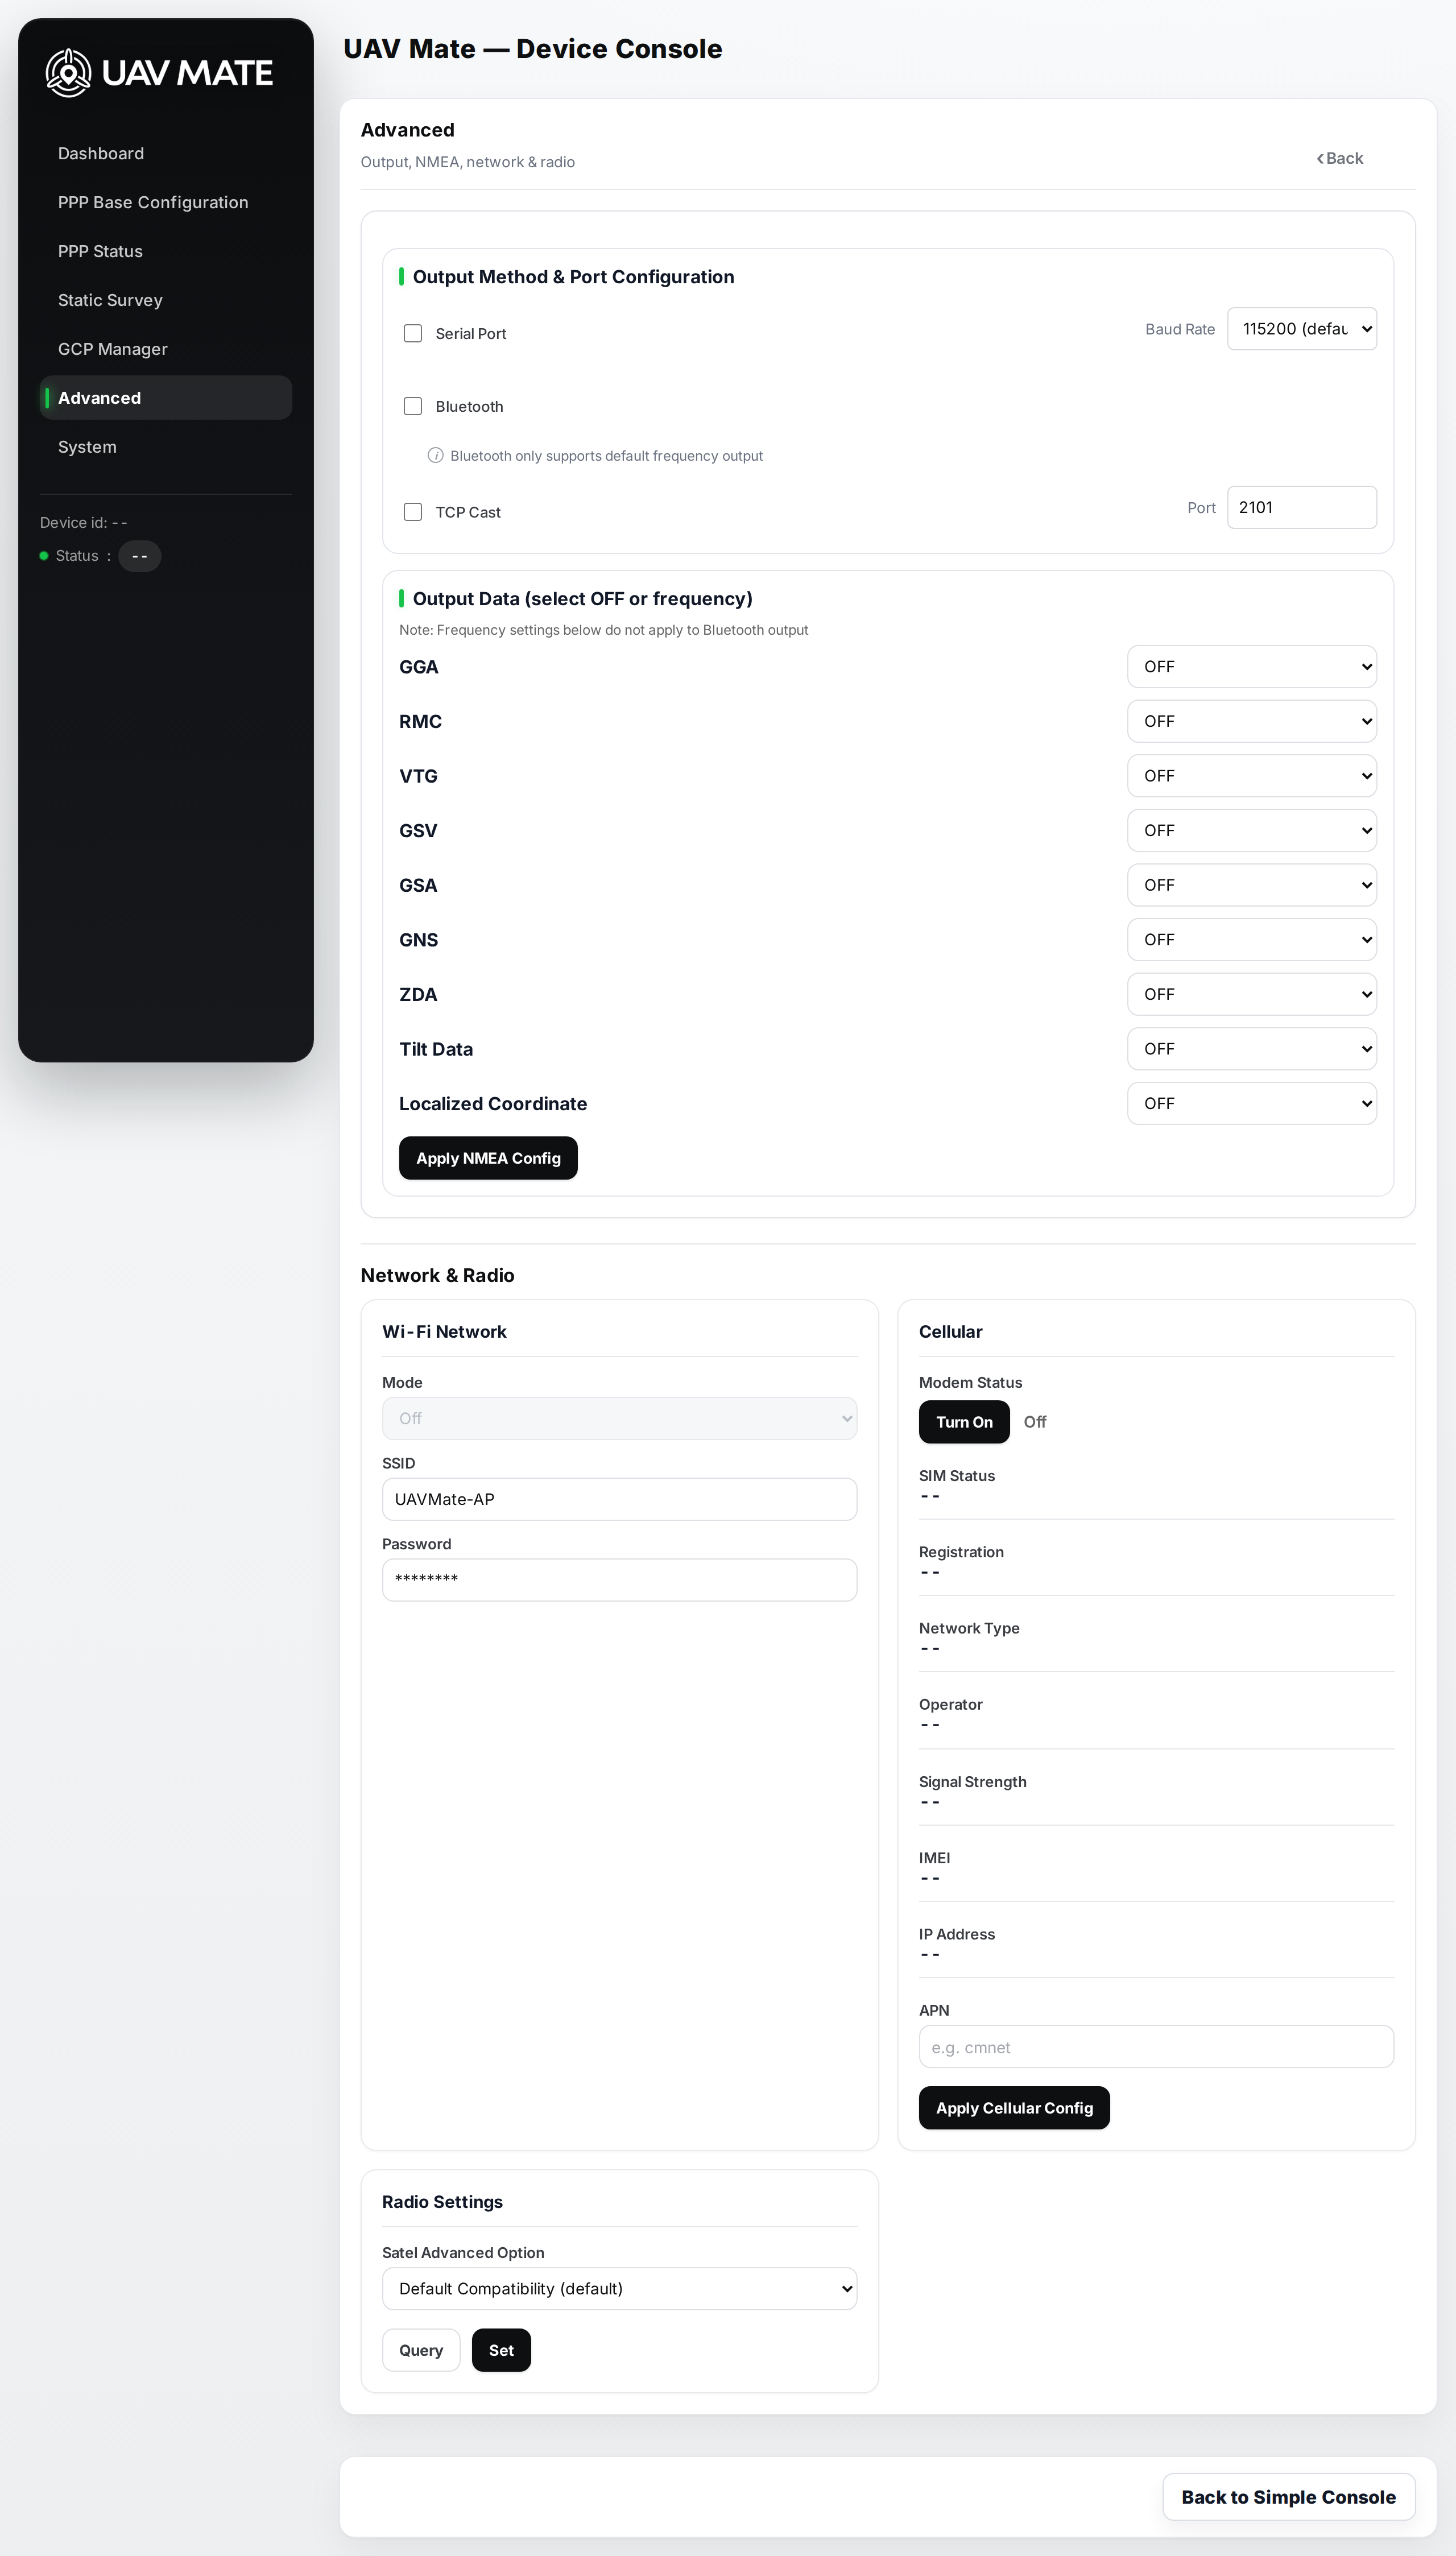
The I/O Configuration page sets how position data leaves the device and how the local caster behaves.
11.1 Output Method & Port Configuration
| Output | Setting |
|---|---|
| Serial Port | Enable + Baud Rate (9600 … 921600) |
| Bluetooth | Enable (default‑frequency output only) |
| TCP Cast | Enable + Port |
Note — Bluetooth output uses the default message frequency; the per‑message rates below do not apply to Bluetooth.
11.2 Output Data (NMEA)
Set each message to OFF or a frequency (10s, 5s, 1Hz, 2Hz, 5Hz, 10Hz):
GGA · RMC · VTG · GSV · GSA · GNS · ZDA
Click Apply NMEA Config to save.
11.3 Local NTRIP Caster
This is the on‑device caster that broadcasts base corrections over Wi‑Fi.
| Field | Notes |
|---|---|
| Enable Caster | Yes / No (default Yes) |
| Host / IP | 192.168.2.1 — the receiver's private Wi‑Fi gateway (clients connect here) |
| Port | Default 2101 |
| Mountpoint | Mountpoint name |
| Username | Default uavmate |
| Password | Default uavmate123 |
| Buttons | Apply Config, Refresh Status |
11.4 Radio Settings
The internal UHF radio can broadcast corrections (base) or receive them (rover). Configure under I/O Configuration → Radio Settings (Professional) or in the Broadcast / Correction source cards (Simple).
| Setting | Options |
|---|---|
| Channel / Frequency | CH1 457.550 · CH2 458.050 · CH3 458.550 · CH4 459.050 · CH5 459.550 · CH6 460.550 · CH7 461.550 · CH8 462.550 · CH9 463.550 · CH10 464.550 MHz |
| TX power | High — 1 W · Low — 0.5 W |
| Protocol | Transparent · TrimTalk450 · TrimMark3 · Satel · South |
| Air baud rate | 4800 · 9600 · 19200 bps (available rates follow the protocol) |
Pairing rule — transmitter and receiver must use the same channel, protocol and air baud rate. The radio stays idle until the base is ready, then transmits automatically.
Regulatory — UHF transmit frequencies and power are subject to local licensing. Confirm what you may legally use in your region before enabling the radio.
12. Reference — Static Survey
Record a raw‑data session on the device for later post‑processing (PPK).
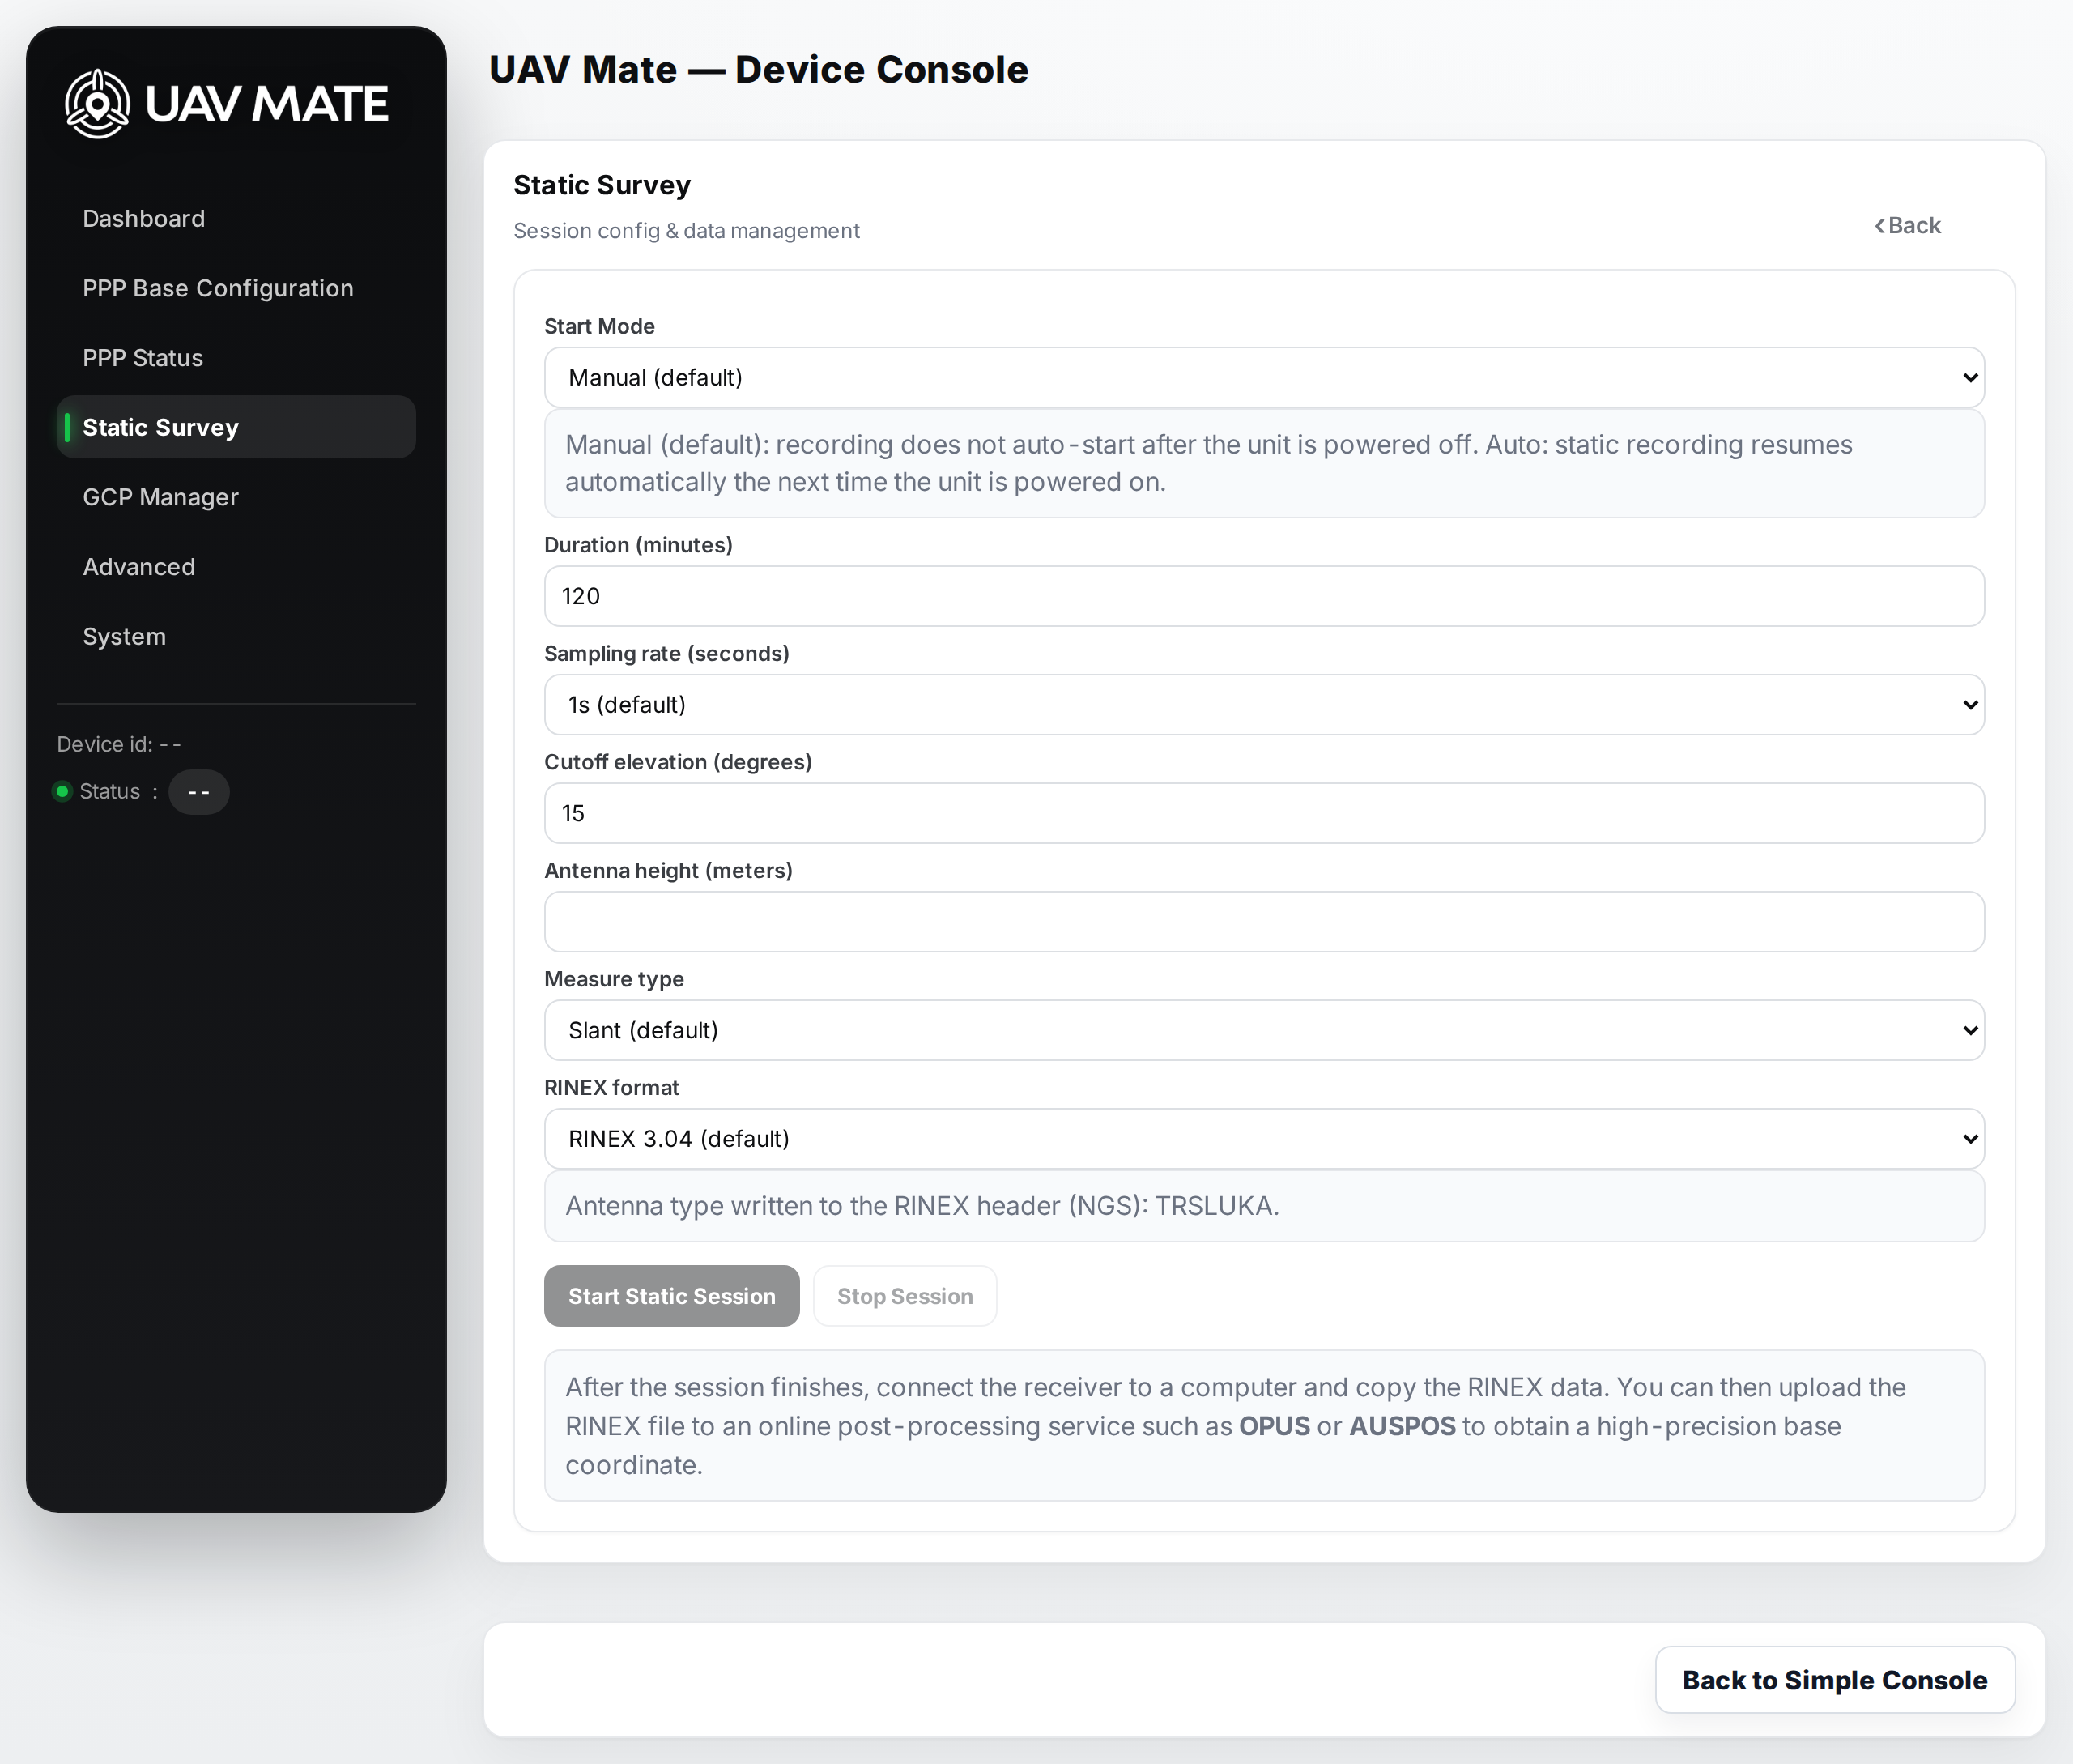
| Field | Notes |
|---|---|
| Measure type | Session type |
| Antenna height (metres) | Measured antenna height |
| Sampling rate (seconds) | Logging interval |
| Duration (minutes) | Planned session length |
| Cutoff elevation (degrees) | Satellite elevation mask |
| Start Mode | Session start behaviour |
| Format | RINEX format / TRS format |
| Buttons | Start Static Session, Stop Session |
12.1 Retrieving the recorded data
- Wait for the session to finish (or tap Stop Session).
- Connect the receiver to a computer with the USB‑C cable. Two drives mount: Data and Update.
- Open the Data drive → Record folder and copy the session files to your computer.
- Upload the RINEX file to a post‑processing service such as OPUS or AUSPOS (or your own PPK software) to obtain a high‑precision coordinate.
(Recorded data is only in the Data drive; the Update drive is not used for it.)
13. Reference — GCP Manager
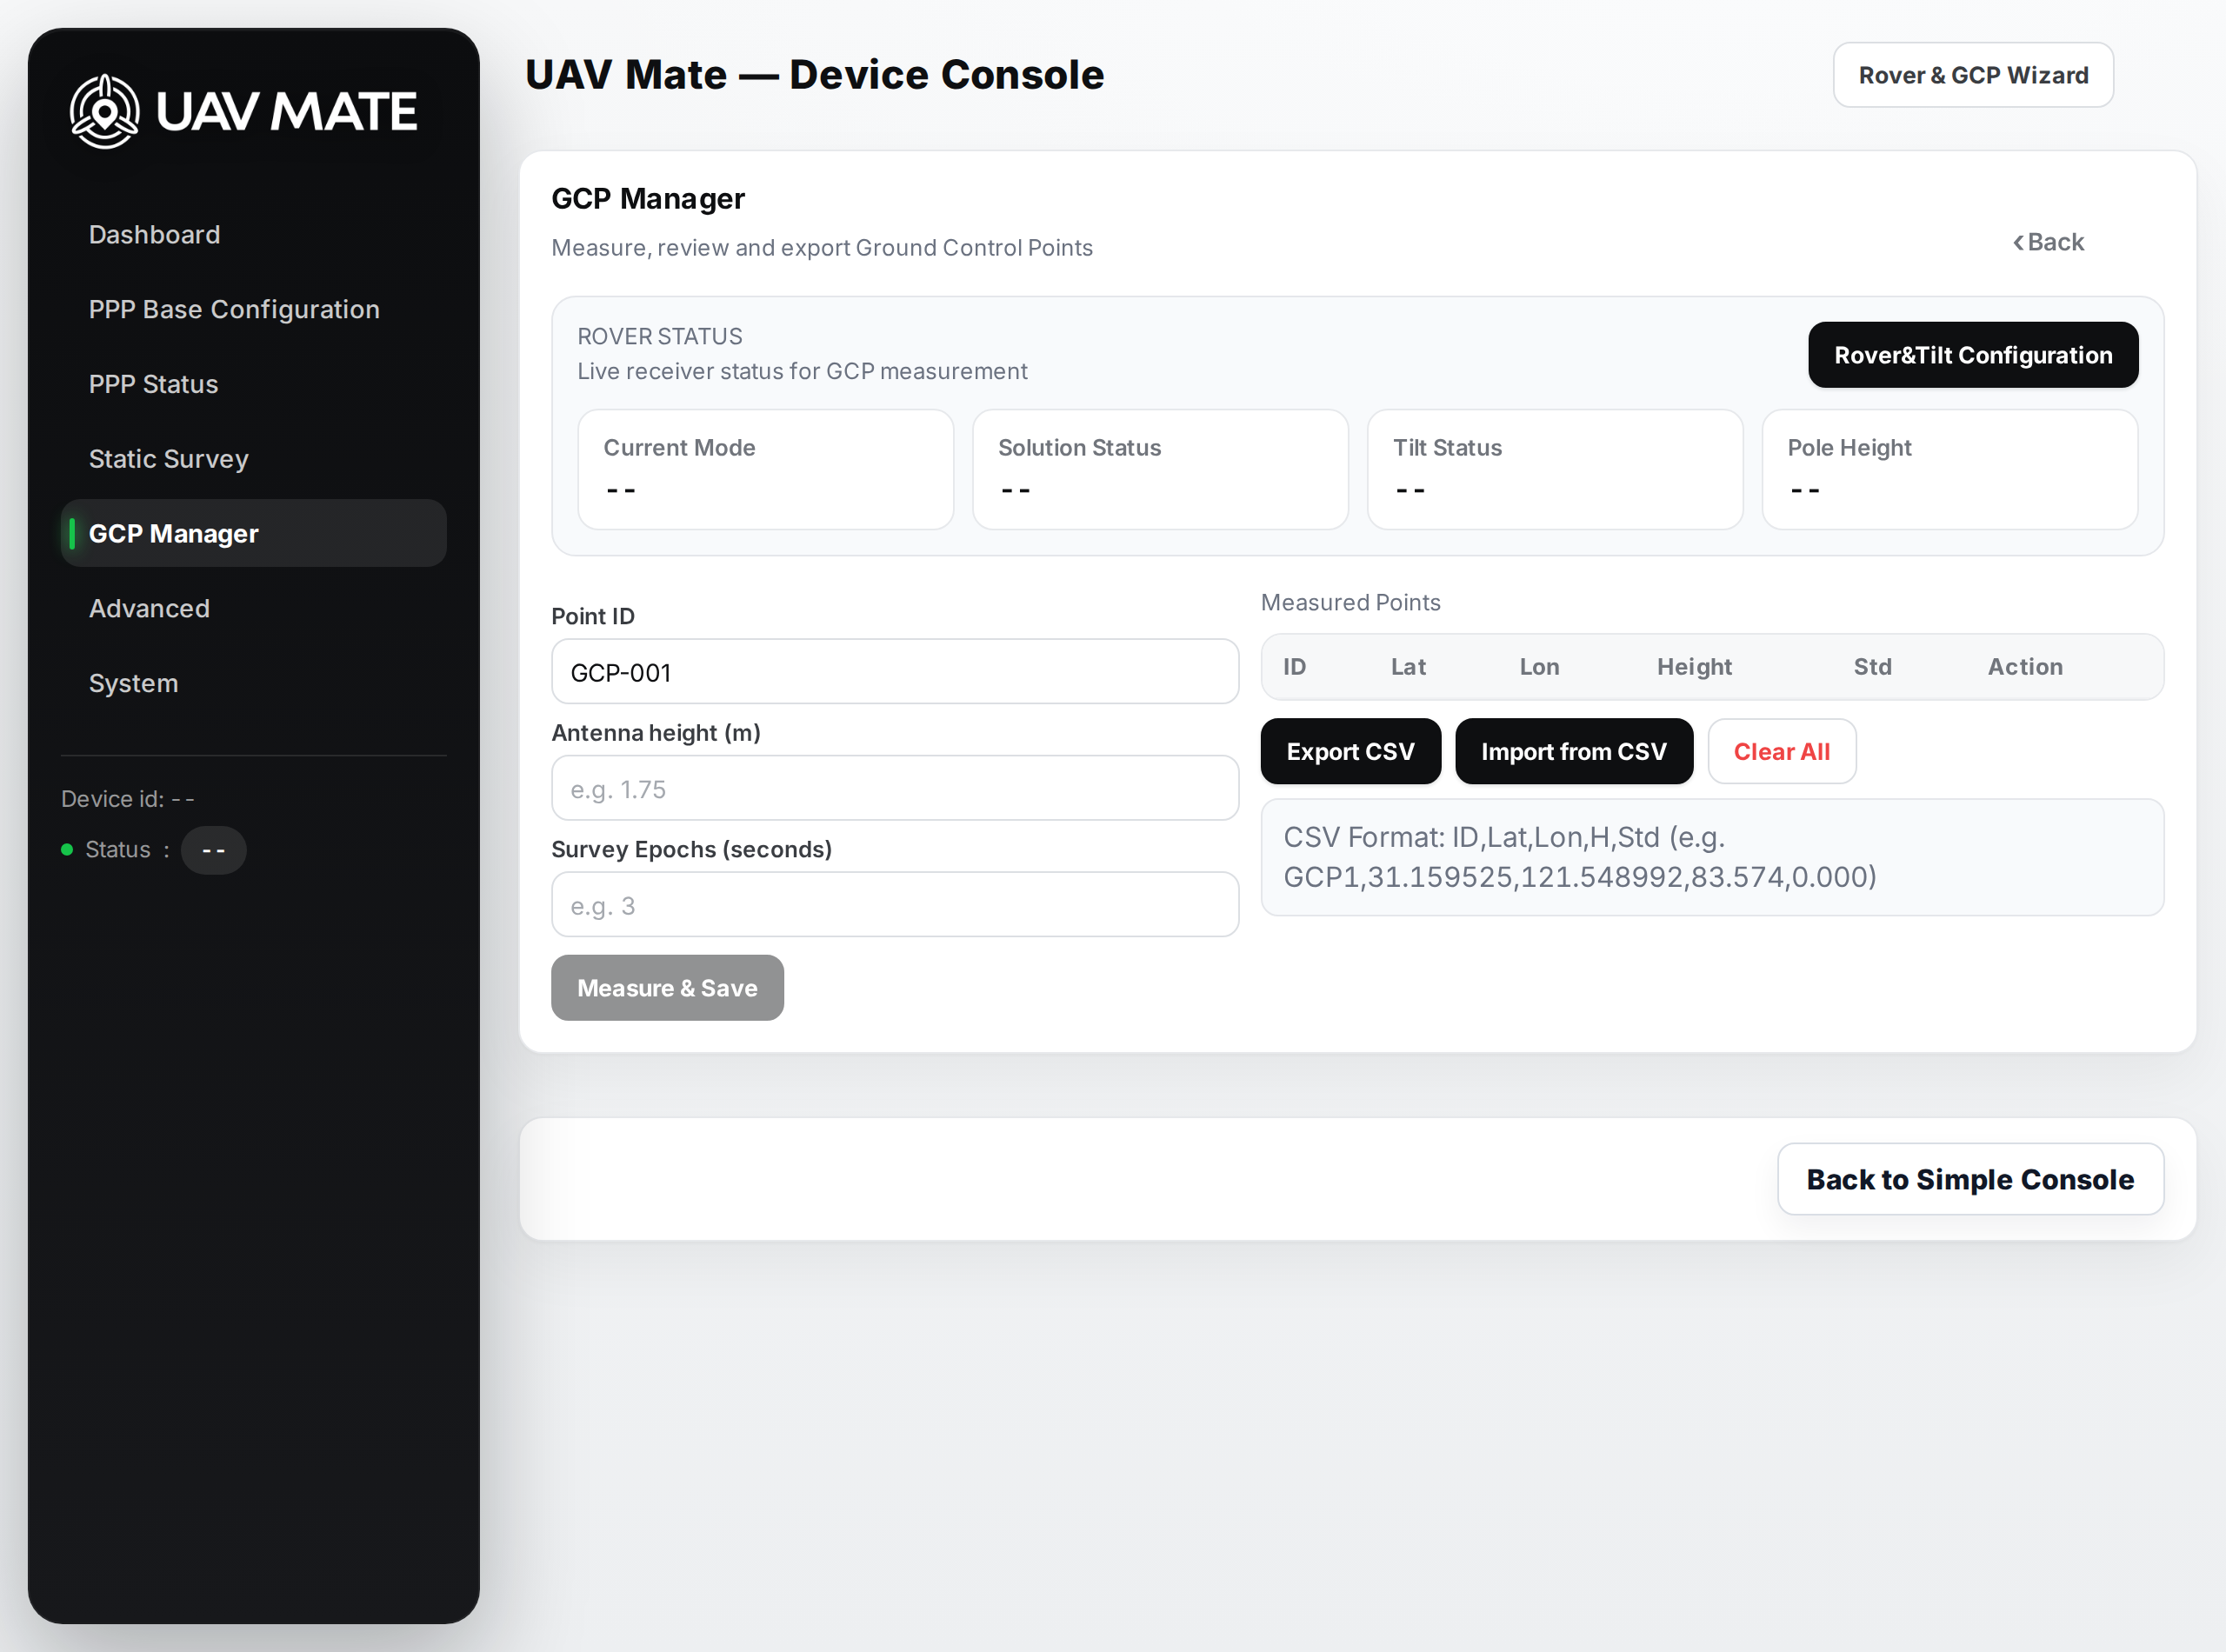
Measure, review, and export Ground Control Points. UAV Mate must be in Rover mode and report an RTK Fixed solution before a point can be saved.
13.1 Measuring a point
| Field | Notes |
|---|---|
| Point ID | Name/identifier for the point |
| Antenna height (m) | Pole/antenna height at the mark |
| Samples | Number of epochs to average (e.g. 3) |
| Measure & Save | Averages the samples and stores the point. Allowed only on an RTK Fixed solution. |
Warning — If the solution is not Fixed (e.g. Single, Float, or PPP Converging), Measure & Save is blocked and the console tells you the current solution. Wait for L1 / Wide / Narrow Fixed or PPP Fixed before measuring.
13.2 Measured Points table
Columns: ID · Lat · Lon · Height · Std · Solution. The Solution column records the solution status at the moment of capture, so you can audit point quality later.
13.3 Managing points
| Control | Action |
|---|---|
| Export CSV | Export all points (Point ID, Latitude/Longitude, Ellipsoid Height, RMS H/V, Solution) for photogrammetry/GIS. |
| Import from CSV | Load points from a CSV file. |
| Clear All | Remove all measured points. (Cannot be undone.) |
Tip — A separate GCP Manager — Quick View appears on the Dashboard showing the most recent points measured in the current project.
14. Reference — System & Modules
14.1 System
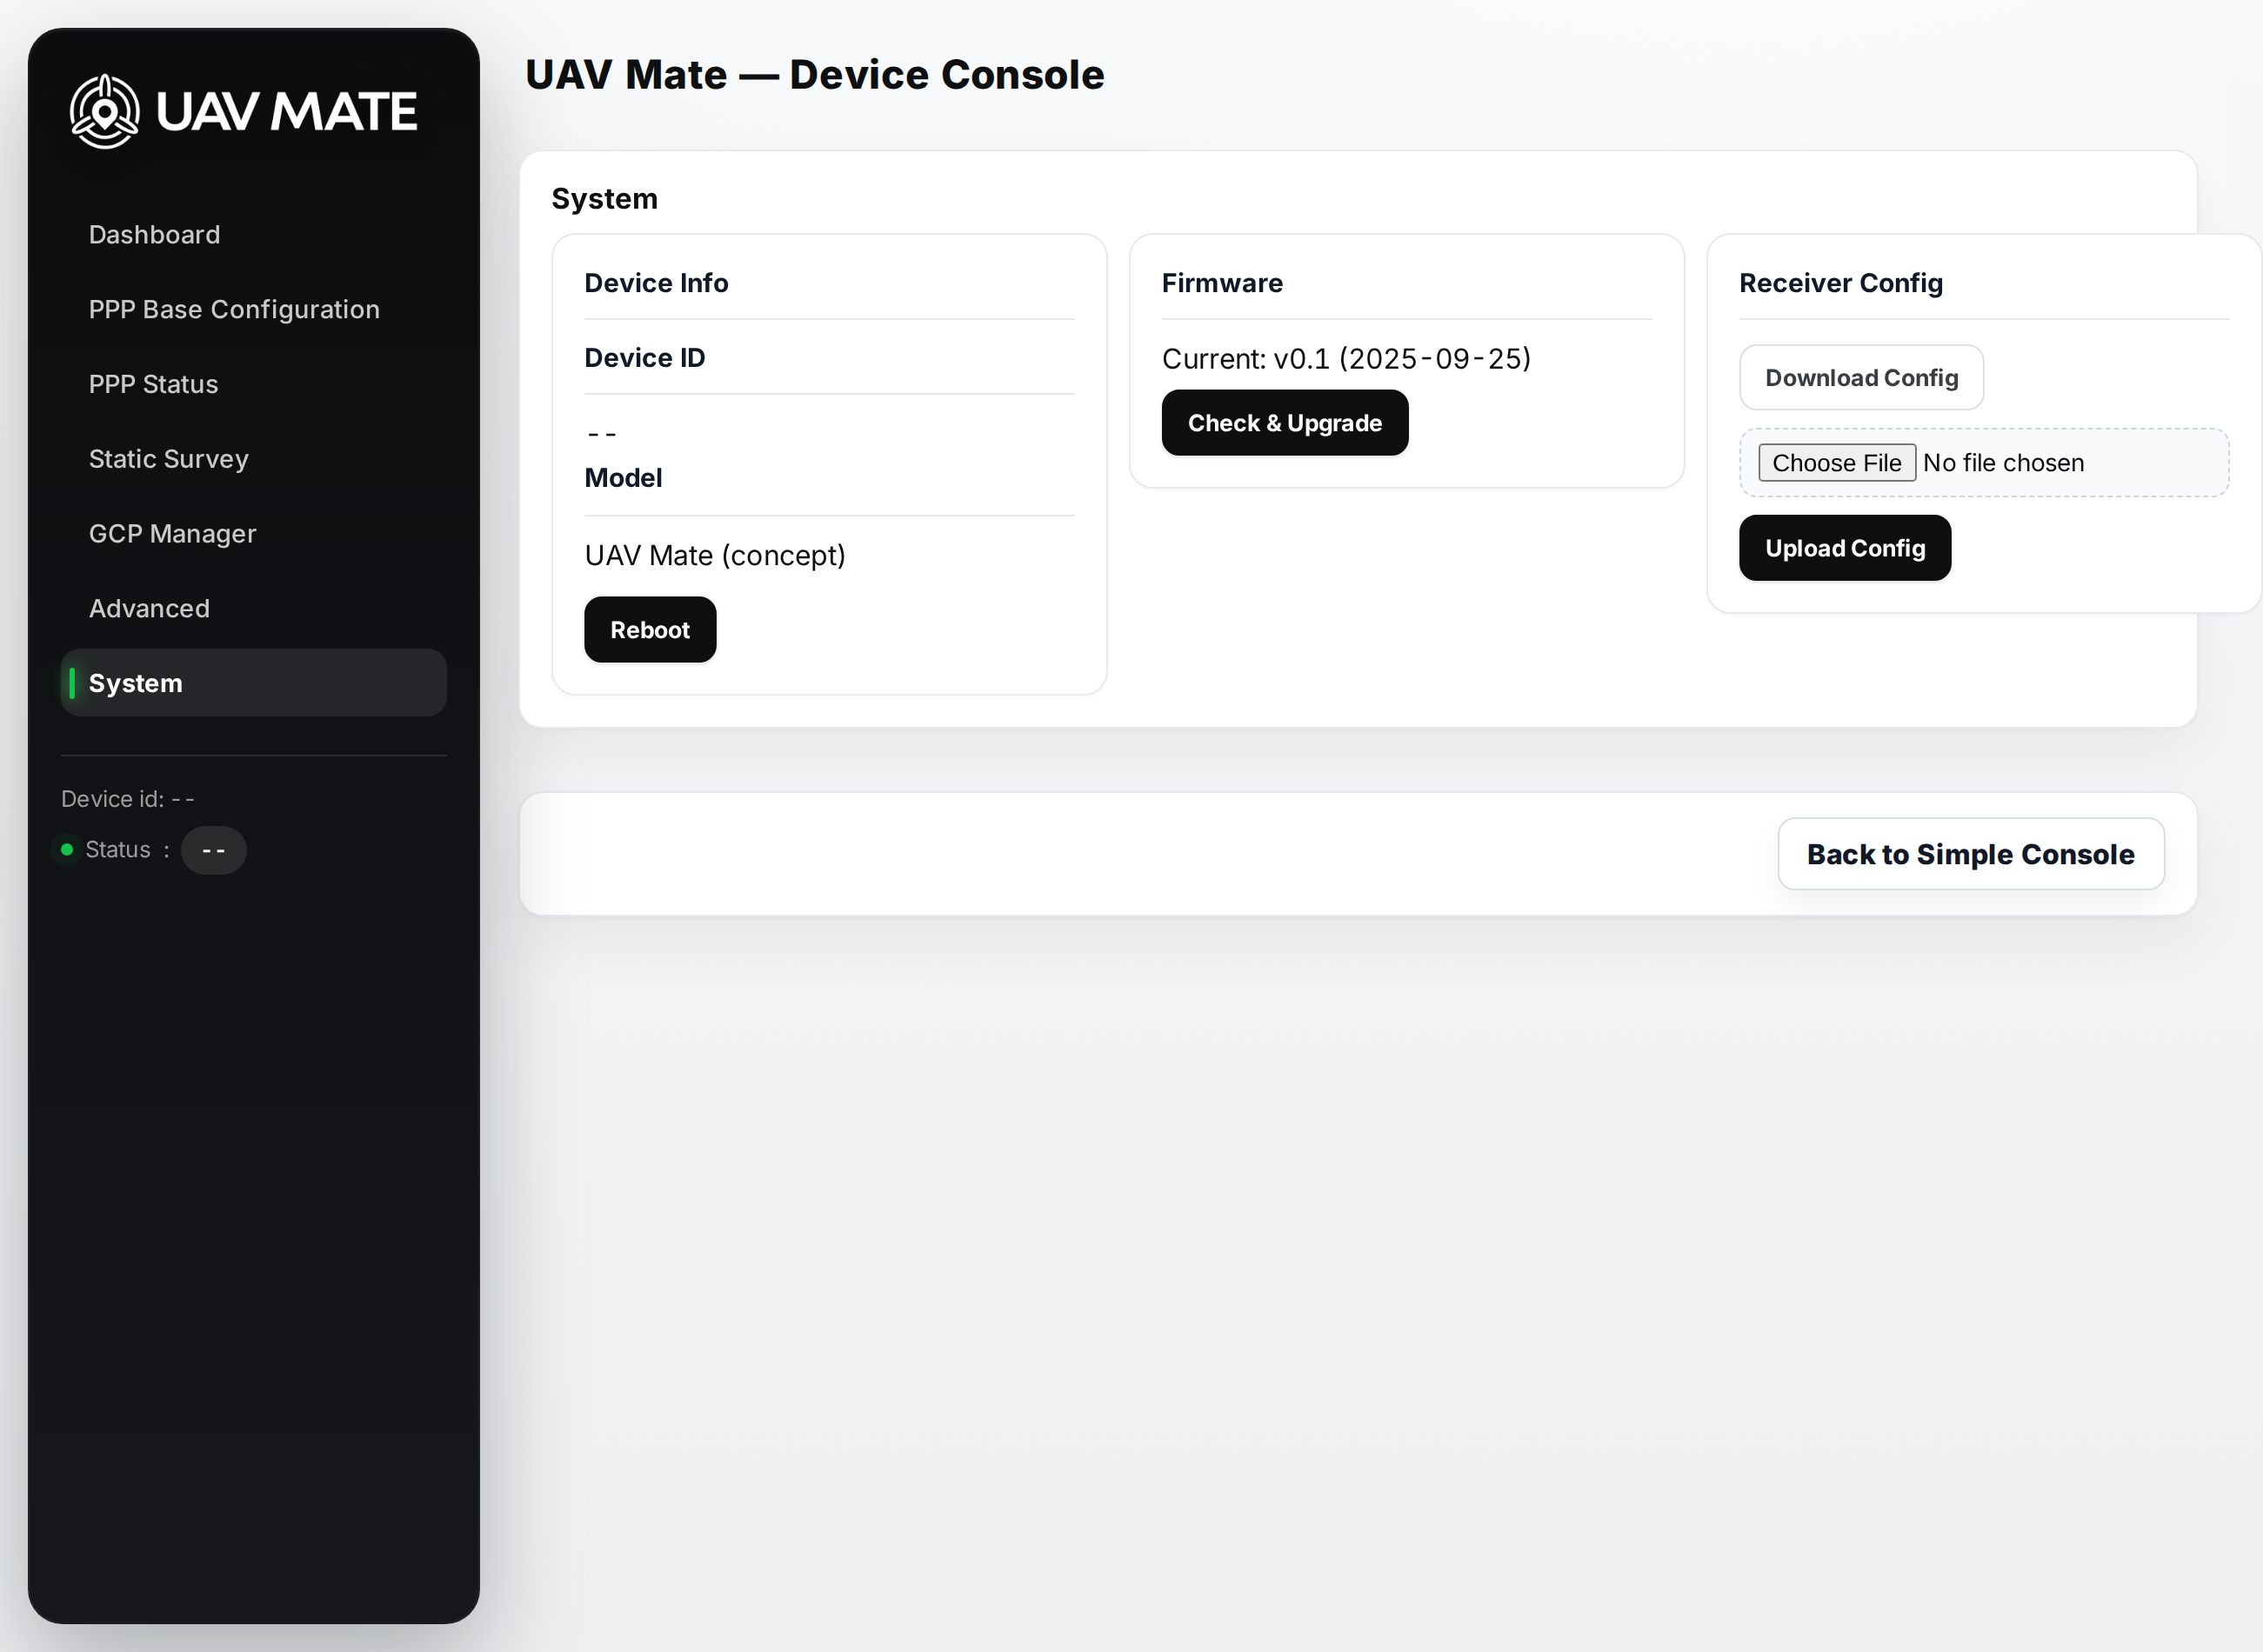
| Area | Items |
|---|---|
| Wi‑Fi | SSID, IP Address, MAC Address |
| Cellular | APN, Network Type, Operator, Registration, SIM Status, IMEI, Signal Strength, Modem Status — Apply Cellular Config |
| Power | Battery level, Power state |
| Firmware | Check & Upgrade |
| Configuration | Download Config / Upload Config (backup & restore) |
| Maintenance | Reboot, Factory Reset |
Warning — Factory Reset erases your settings and presets. Export your configuration first with Download Config.
14.2 Cellular (4G)
Used by External NTRIP server broadcasting and CORS rover corrections. Install a SIM, then configure under Device › Cellular (Simple) or System (Professional): APN, optional APN username/password, and authentication (None / PAP / CHAP / PAP+CHAP). Enter the APN exactly as issued by your SIM provider.
14.3 Recorded data — RINEX & logs
Raw observation files and logs are stored on the device (about 8 GB of built‑in storage). To retrieve them, connect the receiver to a computer over USB — two drives mount, Data and Update — and copy the files from Data › Record. Copy what you need before long projects.
14.4 Updating firmware
Firmware updates are applied from a local file — no internet needed. Get the firmware file from UAV Mate or your dealer, then use either method:
Method A — through the web console
- Save the firmware file on your phone/laptop.
- Open Device › Firmware update (Simple) or System (Professional), choose the file, and tap Upgrade firmware.
- Keep the receiver powered throughout the update. The console reports the detected firmware date and skips the update if you are already current.
Method B — through the USB Update drive
- Connect the receiver to a computer with the USB‑C cable. Two drives mount: Data and Update.
- Copy the firmware file into the Update drive, then safely eject the drives.
- Restart the receiver — the update is applied on start‑up. Keep the unit powered until it has restarted.
14.5 Modules
The Modules page manages optional hardware (e.g. the cellular modem). Use Turn On / Apply Cellular Config to enable and configure a module.
15. Understanding Solution Status
The Dashboard shows the current Solution Status. Higher‑quality fixes mean more accurate positions. The table groups the statuses you will see.
| Group | Status (as shown) | Meaning / use |
|---|---|---|
| RTK Fixed — survey‑grade | L1 Fixed, Wide Fixed, Narrow Fixed, PPP Fixed | Centimetre‑level, integer‑fixed. Required for GCP measurement. |
| Converging / float | PPP Converging, PPP, L1 Float, Iono‑Free Float, Narrow Float, Float Conv, Wide Lane, Narrow Lane | Solution is still improving; not yet survey‑grade. Wait for Fixed. |
| Standalone / differential | Single, DGNSS, SBAS, Doppler, Propagated | Sub‑metre to several‑metre; navigation only. |
| Base fixed‑position | Fixed Position, Fixed Height | The unit is acting as a base with a held coordinate. |
| Other | Unknown | No valid status reported. |
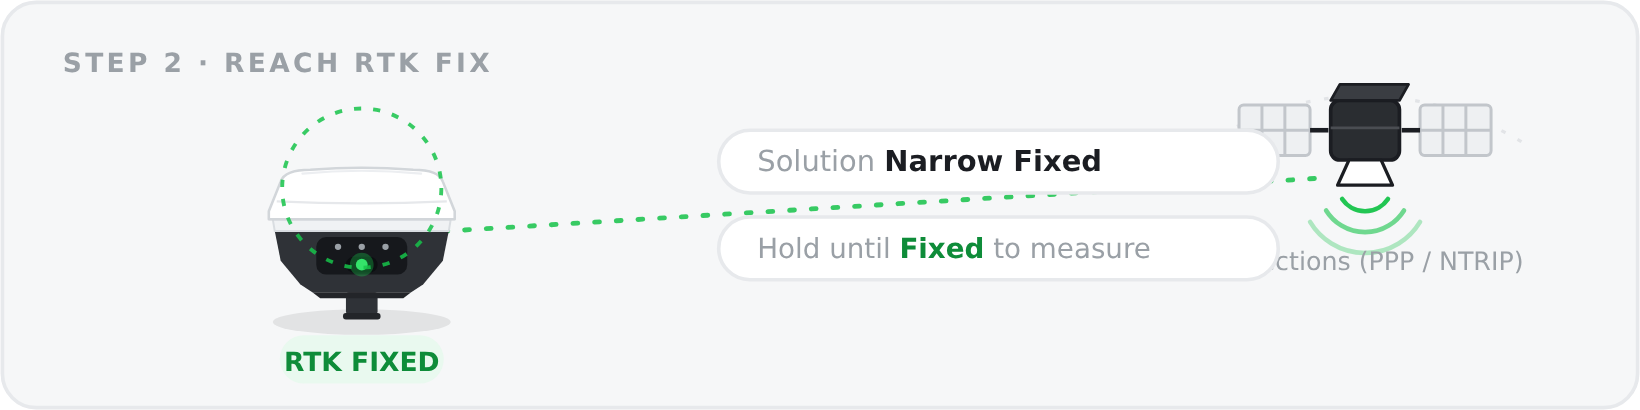
Note — For GCP work, only L1 Fixed / Wide Fixed / Narrow Fixed / PPP Fixed are accepted by Measure & Save. Narrow Fixed is the best.
On‑screen display — On the PPP Status page (and in the wizards / Base Mode Config when using PPP), these statuses are summarised as a four‑stage indicator — Single → Converging → Float → Fixed — with signal bars, an estimated time to Fixed, and the estimated accuracy (H / V RMS).
16. Specifications
Figures from the UAV Mate Datasheet (V1.0, 2026‑02). Real‑world PPP performance depends on sky view and atmospheric conditions.
Positioning accuracy (RMS)
| Mode | Horizontal | Vertical |
|---|---|---|
| Single point | 1.5 m | 2.5 m |
| DGPS | 0.25 m | 0.5 m |
| High‑precision static | 2.5 mm + 0.1 ppm | 3.5 mm + 0.4 ppm |
| Static & fast static | 2.5 mm + 0.5 ppm | 5 mm + 0.5 ppm |
| PPK | 2.5 mm + 1 ppm | 5 mm + 1 ppm |
| RTK | 8 mm + 1 ppm | 15 mm + 1 ppm |
| Network RTK | 8 mm + 0.5 ppm | 15 mm + 0.5 ppm |
| PPP base (absolute, satellite corrections) | ~15 mm | ~30 mm |
Performance
| Item | Value |
|---|---|
| TTFF | Cold start < 30 s · warm start < 5 s · reacquisition < 1 s |
| RTK initialisation | ~4 s typical, reliability > 99.9 % |
| PPP convergence | typ. 3 min (open sky) |
| Tilt compensation | Calibration‑free, ≤ 2 cm within 60° |
| Data output rate | up to 20 Hz |
System & data
| Item | Value |
|---|---|
| Correction formats | CMR, RTCM 2.3, RTCM 3.x |
| Data output | RINEX, NMEA‑0183, Binary |
| Storage | 8 GB built‑in |
Communication
| Item | Value |
|---|---|
| Wi‑Fi | 802.11 b/g/n (hosts the console and the NTRIP caster) |
| Bluetooth | 4.1 |
| Cellular | 4G LTE / WCDMA / GSM/EDGE (Nano‑SIM) |
| Network protocols | NTRIP Client, NTRIP Server/Caster, TCP |
| Internal UHF radio | 410–470 MHz · 0.5 / 1.0 W · half‑duplex · 12.5/25 kHz · GMSK/4FSK · 4800/9600/19200 bps · protocols incl. TrimTalk450, TrimMark3, Satel, Transparent |
| USB | Type‑C (OTG) |
Electrical, physical & environmental
| Item | Value |
|---|---|
| Battery | 7000 mAh / 7.4 V — up to 10 h (environment‑dependent) |
| Charging | USB‑C fast charge 15 W (5 V / 3 A), ~3 h (20–90 %); external power 5–20 V; charge +10 to +45 °C |
| Dimensions | Ø 132 × 68 mm |
| Weight | ≈ 827 g |
| Mount | 5/8″ × 11 UNC‑2B |
| Operating temperature | −40 °C to +70 °C (storage −55 to +85 °C) |
| Ingress protection | IP68 (dust & water proof) |
| Relative humidity | 100 %, non‑condensing |
| Pole drop | 2 m onto concrete |
| Vibration | MIL‑STD‑810G, FIG 514.6C‑1 |
| Warranty | One year |
17. Troubleshooting
| Symptom | Try this |
|---|---|
| Console won't load | Confirm you are connected to the receiver's Wi‑Fi hotspot and using the correct IP. Reload the page. The console needs no internet. |
| Base won't reach a fix | Ensure a clear sky view (no canopy/buildings). PPP needs time to converge — keep the unit stationary. Check PPP Configuration status. |
| Drone shows Float, not Fix | Confirm the base has Started and the caster is enabled (I/O Configuration → Local NTRIP Caster → Refresh Status). Confirm the drone joined UAV Mate's Wi‑Fi and uses the correct caster Host/Port/Username/Password (defaults 192.168.2.1 / 2101 / uavmate / uavmate123; see §7, Step 3). |
| Measure & Save is blocked | The solution is not RTK Fixed. Wait for Narrow/Wide/L1 Fixed or PPP Fixed (Dashboard → Solution Status). |
| Tilt measurement won't complete | Tilt initialisation isn't finished or the attitude isn't valid. Level/rotate the pole as prompted, or disable Tilt Compensation. |
| No serial/Bluetooth output | Check the output is enabled and the message frequency is not OFF (I/O Configuration). Bluetooth uses default frequency only. |
| Lost settings after reset | Restore with System → Upload Config if you exported a backup. |
Tip — Use System → Download Config to keep a backup before firmware upgrades or experiments.
18. Glossary
| Term | Meaning |
|---|---|
| PPP | Precise Point Positioning — absolute cm‑level positioning from satellite corrections, no local base or CORS needed. |
| RTK | Real‑Time Kinematic — cm‑level positioning relative to a base via correction messages. |
| RTCM | Standard format for GNSS correction messages. |
| NTRIP | Protocol for streaming RTCM over IP; a caster serves corrections to clients. |
| GCP | Ground Control Point — a surveyed mark used to georeference/verify a drone survey. |
| ITRF2020 (current epoch) | The global reference frame and epoch in which PPP coordinates are delivered. |
| NMEA | Standard sentences (GGA, RMC, …) carrying position/time/satellite data. |
| Fixed solution | An integer‑resolved RTK solution; the highest‑accuracy state. |
| Tilt compensation | Correcting the measured point for pole tilt using the IMU and pole height. |
19. Appendix — GCP CSV format
Exported points (Export CSV) include, per point:
- Point ID
- Latitude, Longitude
- Ellipsoid Height (m)
- RMS (H / V)
- Solution (status at capture)
Note — Confirm the exact column order/headers against your photogrammetry software's import template. [Insert sample CSV header here once confirmed.]
20. Safety and regulatory information
Important — Read and understand these requirements before using UAV Mate.
20.1 General safety
- Operating or storing the receiver outside its specified temperature range can damage it.
- Do not use the receiver during a thunderstorm — there is an increased risk of a lightning strike.
- When using the internal radio, install the radio antenna before transmitting. Transmitting without an antenna can overheat and damage the radio module.
- Do not operate near electrical blasting caps or in an explosive atmosphere. Keep equipment properly grounded and have it serviced only by a qualified technician.
- Changes or modifications not expressly approved by UAV Mate Inc. may void your authority to operate the equipment and can damage the receiver.
20.2 RF exposure
To limit exposure to radio‑frequency energy, do not operate the transmitter when anyone is within these distances of the antenna:
- Bluetooth / Wi‑Fi / cellular: less than 20 cm
- 410–470 MHz UHF radio: less than 47 cm
Do not operate unless all RF connectors are secured or properly terminated.
20.3 Regulatory compliance
Regulatory approvals and certification marks applicable to your market are shown on the product label and packaging. For current certification information, contact UAV Mate Inc. (sales@uav-mate.com).
20.4 Disposal (WEEE)
Do not dispose of this product with household waste. Dispose of it in accordance with the regulations in force in your country, and prevent access by unauthorised personnel.
20.5 Warranty & support
UAV Mate is covered by a one‑year warranty from the date of purchase (see the UAV Mate Datasheet). For support, contact your dealer or UAV Mate Inc.:
- Web — uav-mate.com
- Email — sales@uav-mate.com
uav-mate.com · © 2026 UAV Mate Inc. All rights reserved. — Document v2.1.